Hubitat® Safety Monitor
Learn how to use Hubitat® Safety Monitor to configure alerts (push notifications, lights, alarms, etc.) in response to intrusion alerts, safety devices, and more
Hubitat® Safety Monitor
Hubitat® Safety Monitor (HSM) lets you set intrusion alerts, safety warnings and other custom alerts. Your alerts can include text messages, push notifications, alarms, flashing lights, and more.
For example, HSM can respond to unexpected motion sensor or contact sensor (door/window) events and send you a push notification, voice/TTS alert, or sound a siren. With compatible water leak sensors, smoke detectors, or custom alerts (supporting a variety of devices like acceleartion, sound, humidity, or temperature sensors and more), HSM can do the same in response to configured events or thresholds for these deviceas as well. With a compatible water valve, HSM can even shut off your water if a leak is detected.
HSM supports various arm states, explained below, that allow configuring different devices or different actions to perform in response to device events for different arm states. For example, you may wish to monitor only door and window sensors for Armed-Nighr or Armed-Home but both door/window and motion sensors for Armed-Away. Smoke/Gas/CO, water, and custom HSM monitoring rules are always armed unless the "Disarm All Monitoring" option is used.
HSM Statuses
- Armed-Away: HSM is armed (alerts/notifications active) using your Armed-Away settings
- Armed-Night: HSM is armed (alerts/notifications active) using your Armed-Night settings
- Armed-Home: HSM is armed (alerts/notifications active) using your Armed-Home settings
- Intrusion Disarmed: HSM is not armed for any of the Armed-Away, Armed-Night, or Armed-Home settings
- Intrusion Disarmed, Water/Smoke/Gas/CO Armed: HSM is not armed for any of the Armed-Away, Armed-Night, or Armed-Home settings, but rules monitoring water, smoke/gas/CO, or custom monitoring rules are still in effect.
- All Monitoring Disarmed: HSM is not armed for any of the Armed-Away, Armed-Night, or Armed-Home settings, and. no water, smoke/gas/CO, or custom monitoring rules are in effect.
Setting Your Intrusion Alerts
As an example, let's set up Intrusion-Away. You can use these same steps to setup your Intrusion-Home alerts, Intrusion-Night alerts, alerts for Smoke and Carbon Monoxide, and Water alerts. Once your first alert has been setup, you will see options to configure your armed states, as below.
-
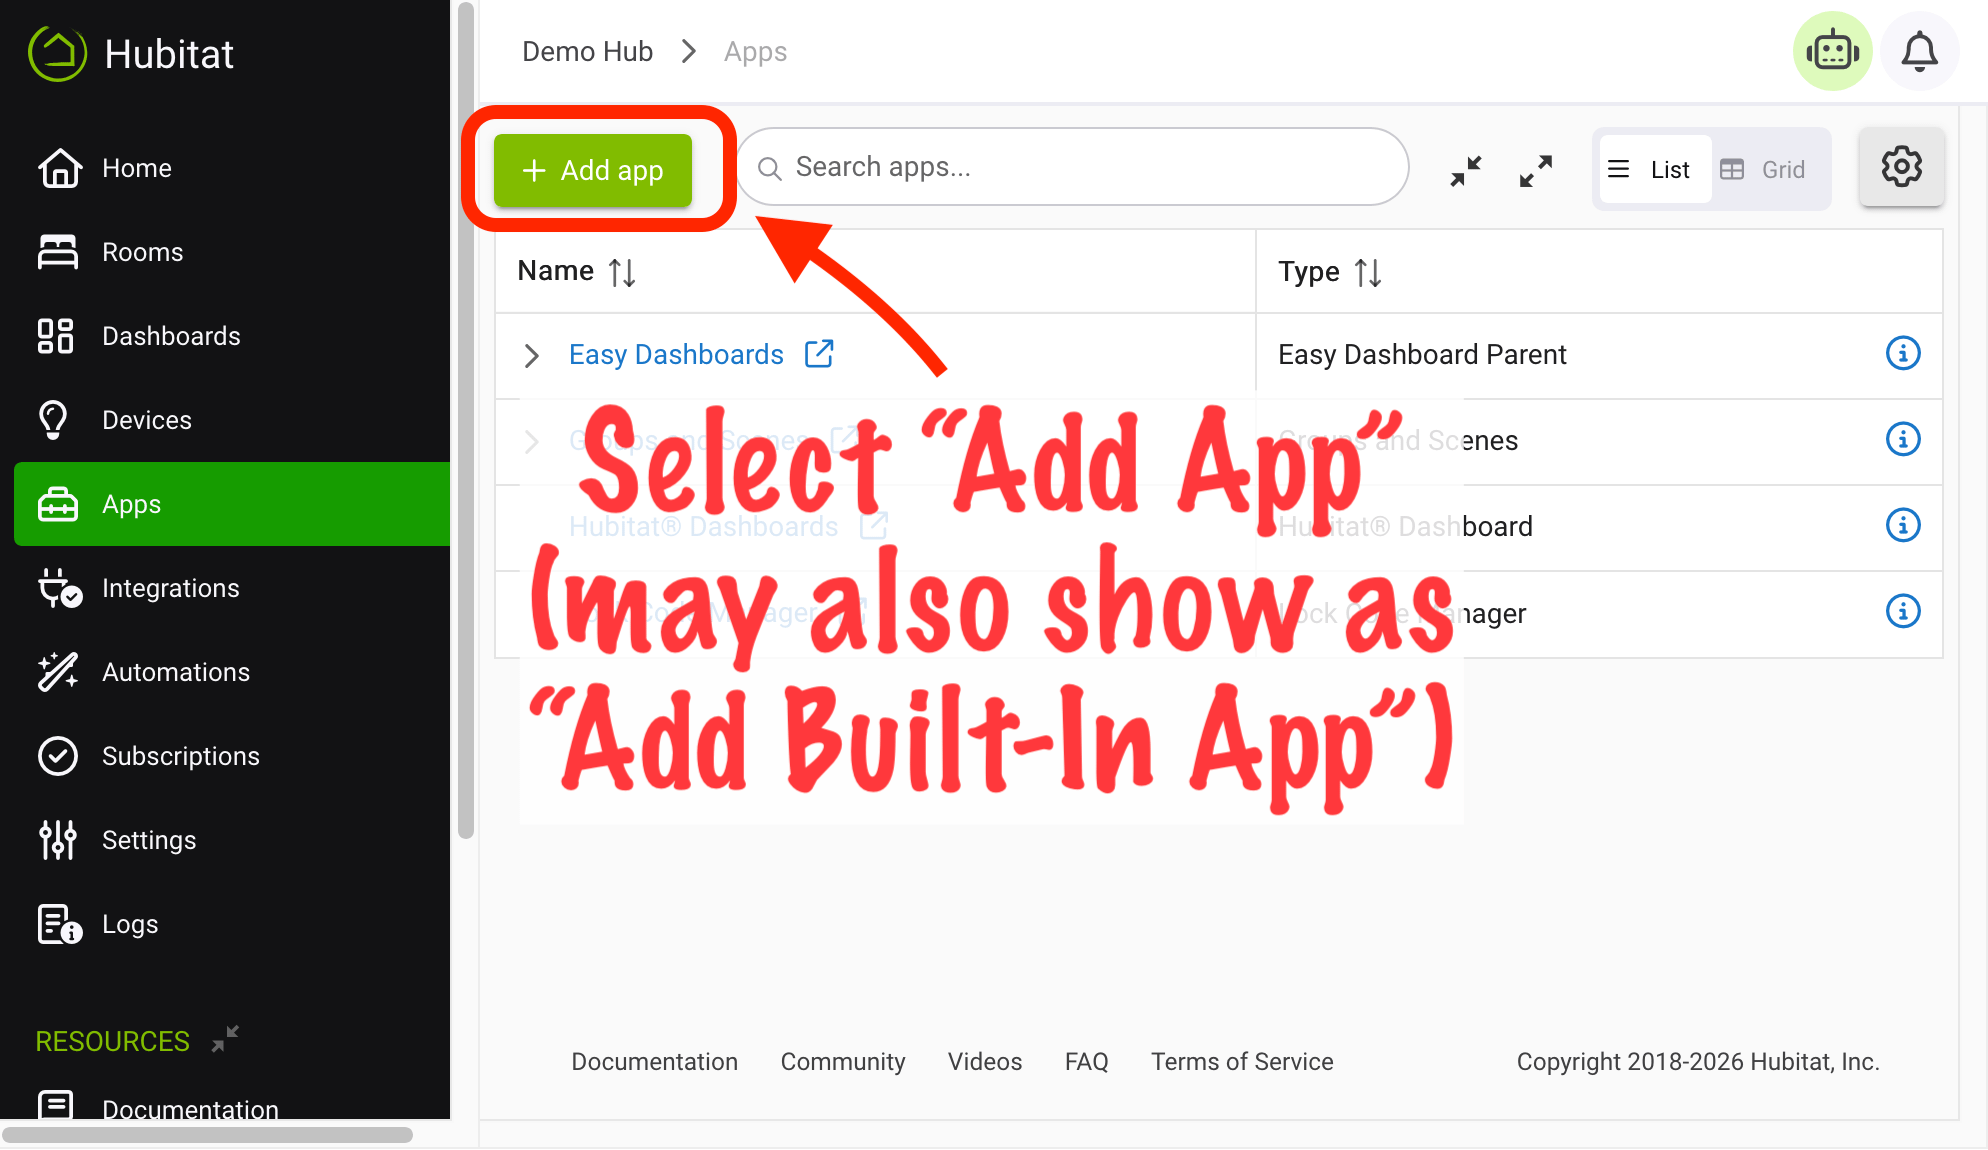
From the sidebar of your hub, select Apps and then Add Built-In App.
-
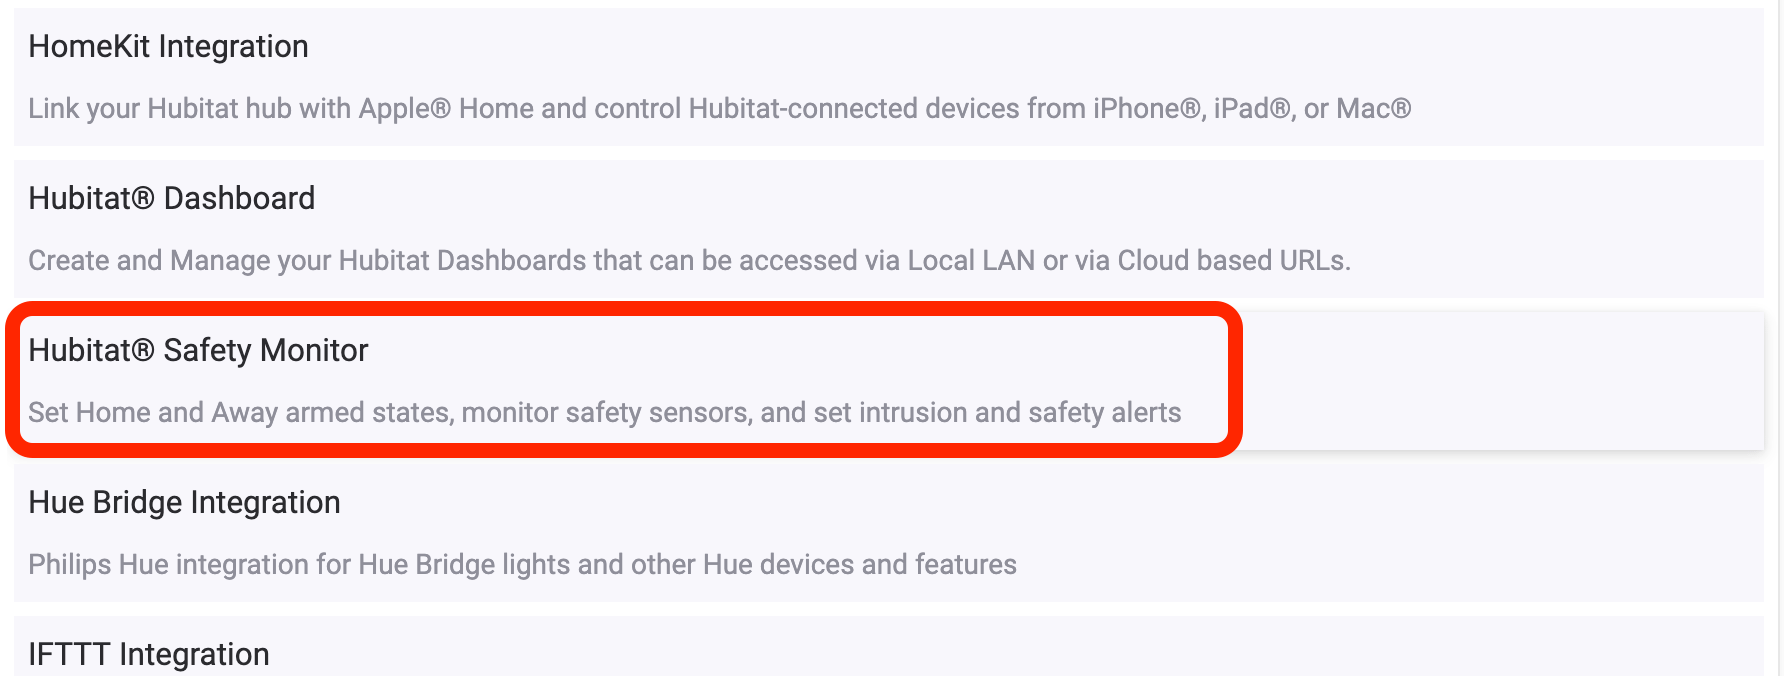
Choose Hubitat Safety Monitor from the list.
As an an example, let's configure the Intrusion-Away settings:
- Select Intrusion-Away to begin.
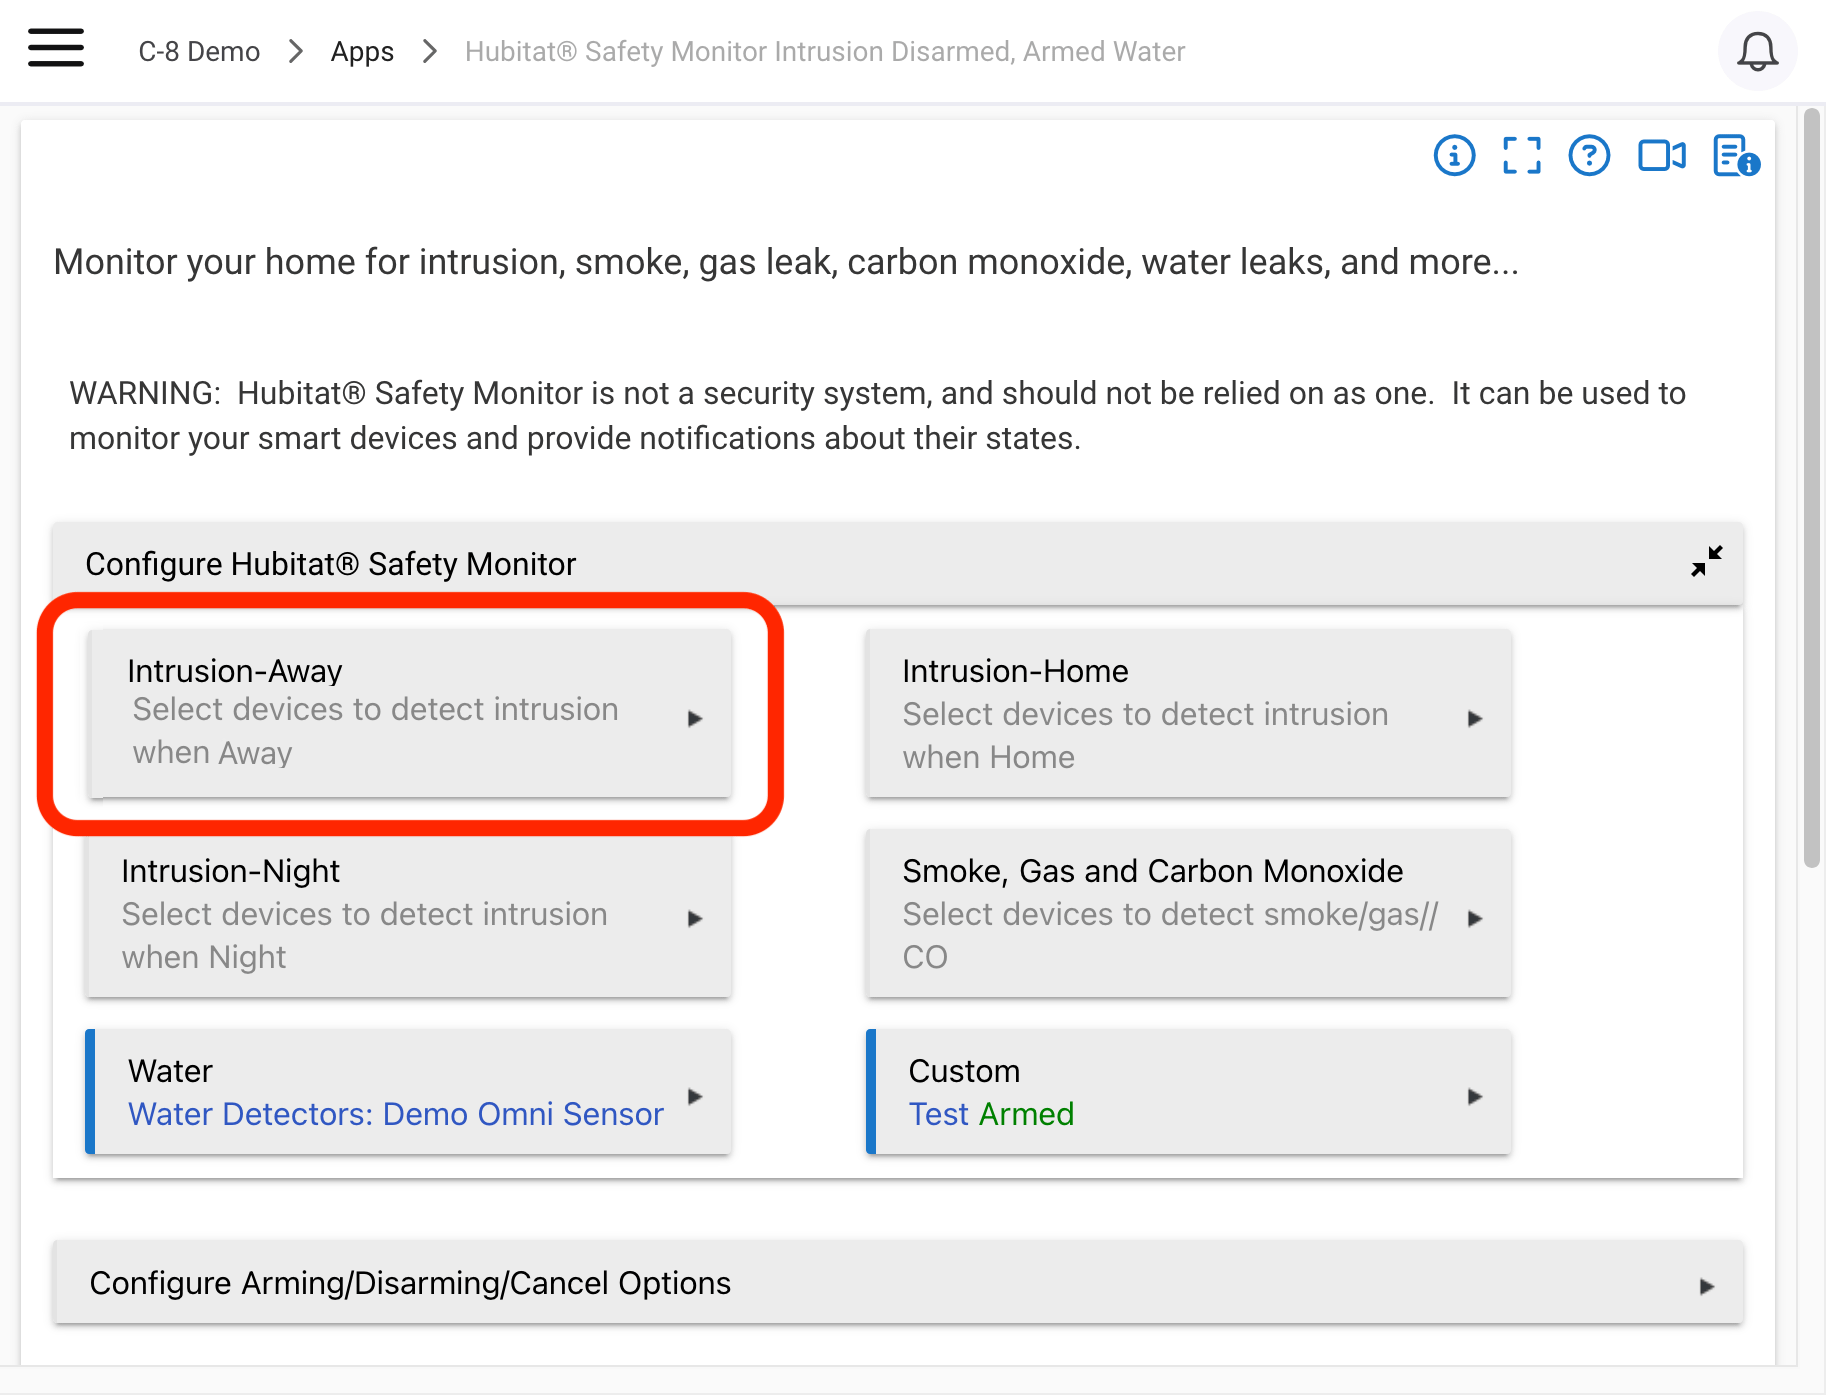
NOTE: You can set different intrusion alerts for when you are home and when you are away (and even different day/home and night settings), if desired. For example, many people like to set all of their motion and contact sensor to alert them when they are away, and only allow windows and door sensors to send alerts when they are home.
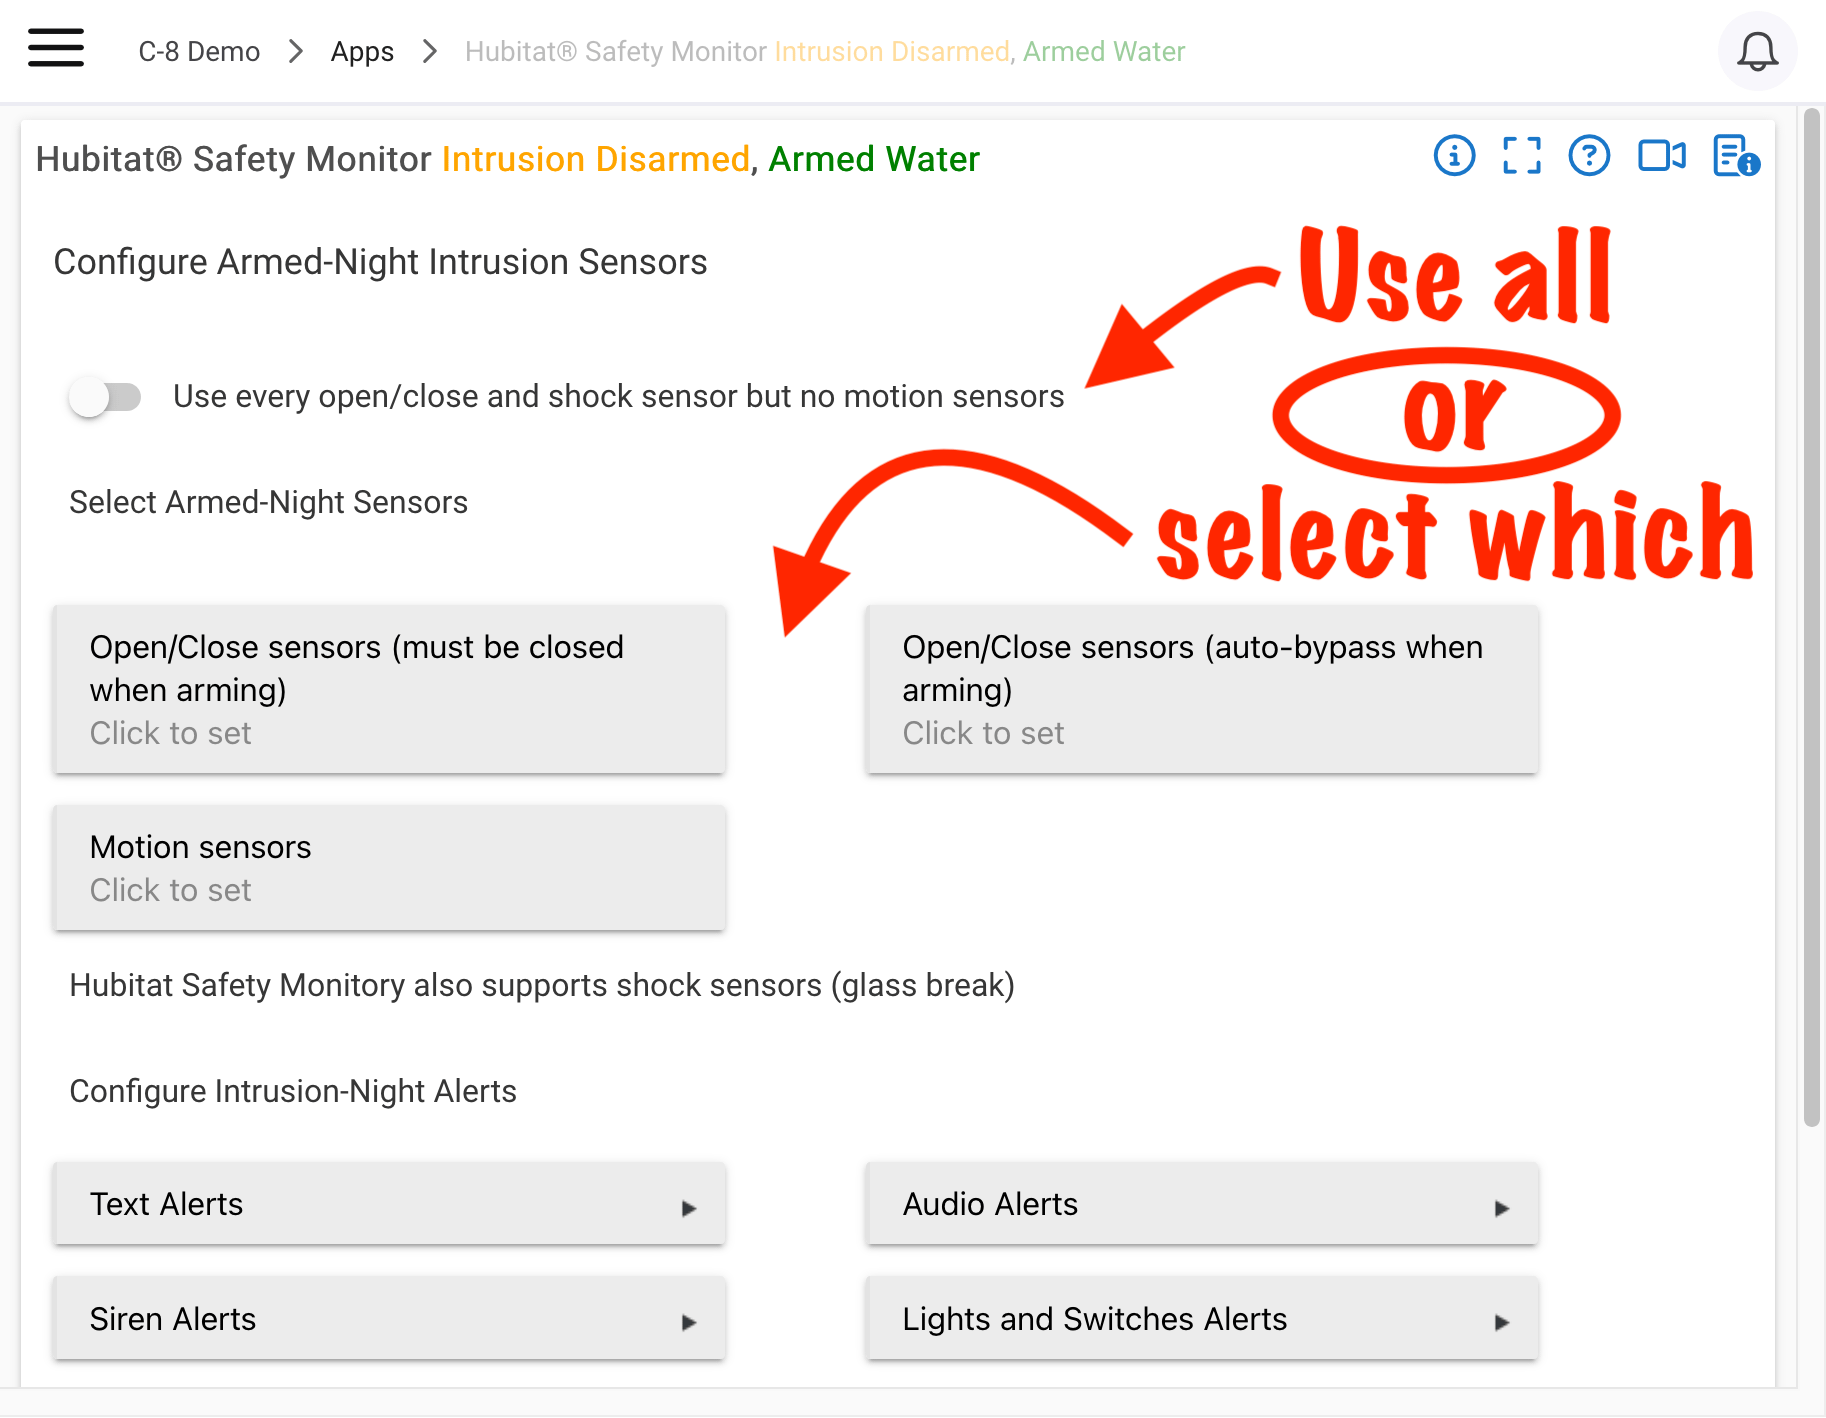
- Next, select the sensors you want to alert you if triggered while your hub is in the Armed-Away state. If you want to use every sensor in your system, toggle the Use every open/close, motion and shock sensor switch on. Otherwise, select specific sensors from the lists.
- Note that there are two options for open/close sensors: one that must be closed in order to arm, and another (labeled auto-bypass when arming) that will allow HSM to arm even if these sensors are open when arming.
- The exact options you see on this page will depend on the devices currently installed on your hub. (For example, in the example above, we do not have any glass break sensors installed, but there would be an option to select these sensors if we did; you may see different options as well, depending on your actual devices.)
NOTE: The "Use every open/close, motion, and shock sensor" option — and similar options on other pages, like "Use every smoke, gas and carbon monoxide detector" — will use every device of the specified types currently on your system. If you add more such devices in the future, you must return to HSM and save these settings again.
- Once you've selected your sensors, move down to the Configure Intrusion Alerts section. Here you can select the devices you wish to alert you when an intrusion is detected. Select any one of the alert types and a configuration window will appear:
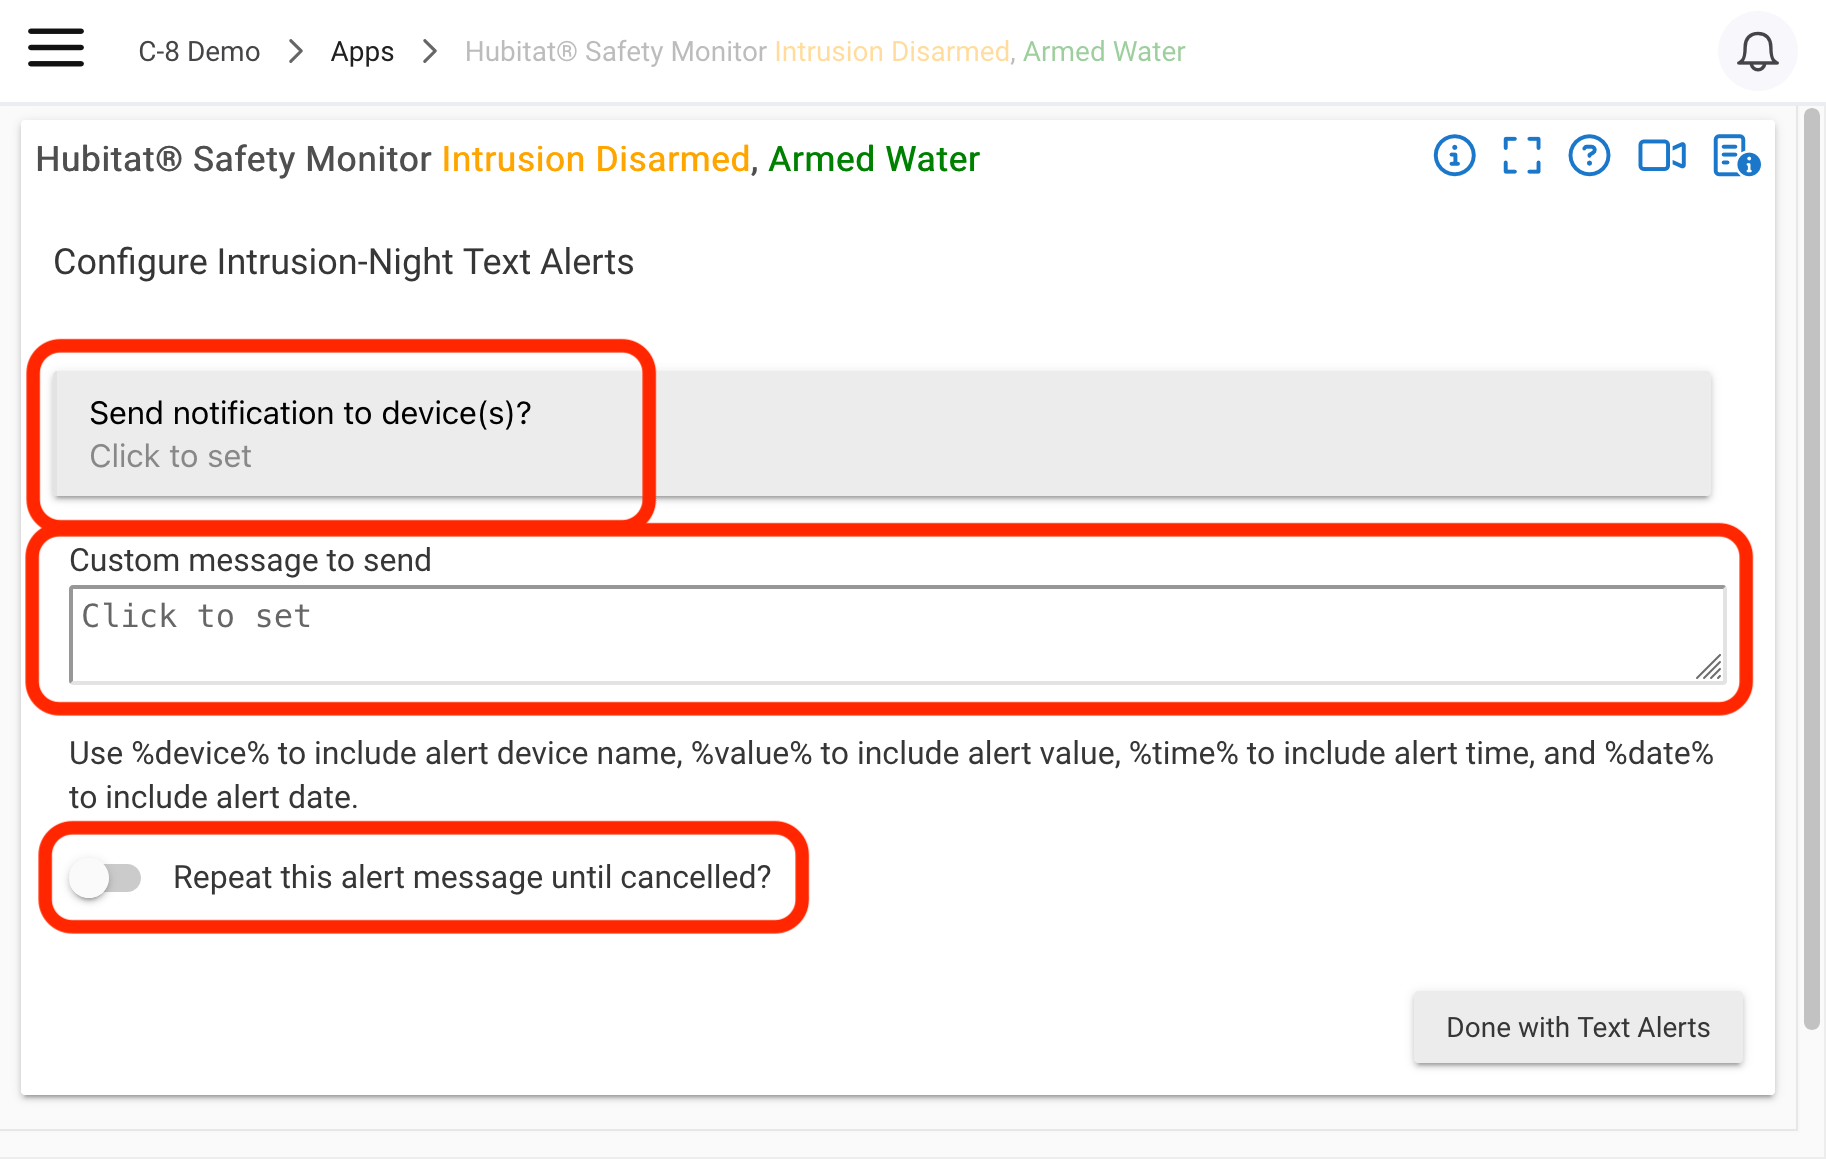
Text Alert (Push Notifications, etc.)
- First select the notification device you want to use. For example, this might be your smartphone if you have installed the Hubitat Elevation app.
- Now write the message you wish to send with the alert is triggered, such as “ALERT! Hubitat Safety Monitor has been triggered.” You can include
%device%to include alert device name,%value%to include value of the event that triggered the alert (e.g., "active" for a motion sensor), and%time%or%date%to include the time or date of the event (not necessarily the current time). - Choose if you would like to repeat sending this alert message until the alert is canceled. If so, enter the time in seconds you would like to wait between repeated messages. Cancellation is a specific action that must be done in the Hubitat Safety Monitor app, the Hubitat mobile app, an option on a Hubitat Dashboard or Easy Dashboard, or a button device event configured to cancel HSM alerts (see below for more on this option).
- Select Done to save your text alert configurations.
Siren Alerts
- Select the siren(s) you want to use from the dropdown menu, then select the function you want to trigger. You may select multiple functions (such as strobe and siren) if your device has multiple warning capabilities.
- Click Done to save your siren alert configuration.
Lights Alerts
- Some users turn on lights to deter intruders. You can select which lights you want to turn on (and if they are dimmable, you can choose the level), which lights you want to flash (if supported by the light), and which lights you want to turn on to a set color (for lights that support color changing).
- Select Update to save your alert lights.
- Select Done to save your configuration.
- NOTE: Any lights you choose to flash must have the capability. You can determine if the lights are capable of flashing by looking at the device detail page. If a flash button (command) exists, the driver is capable of flashing your lights, and if it works when testing manually on this page, it should also work in HSM. Selecting a device that does not support this capability may prevent other parts of your alerts from working as configured.
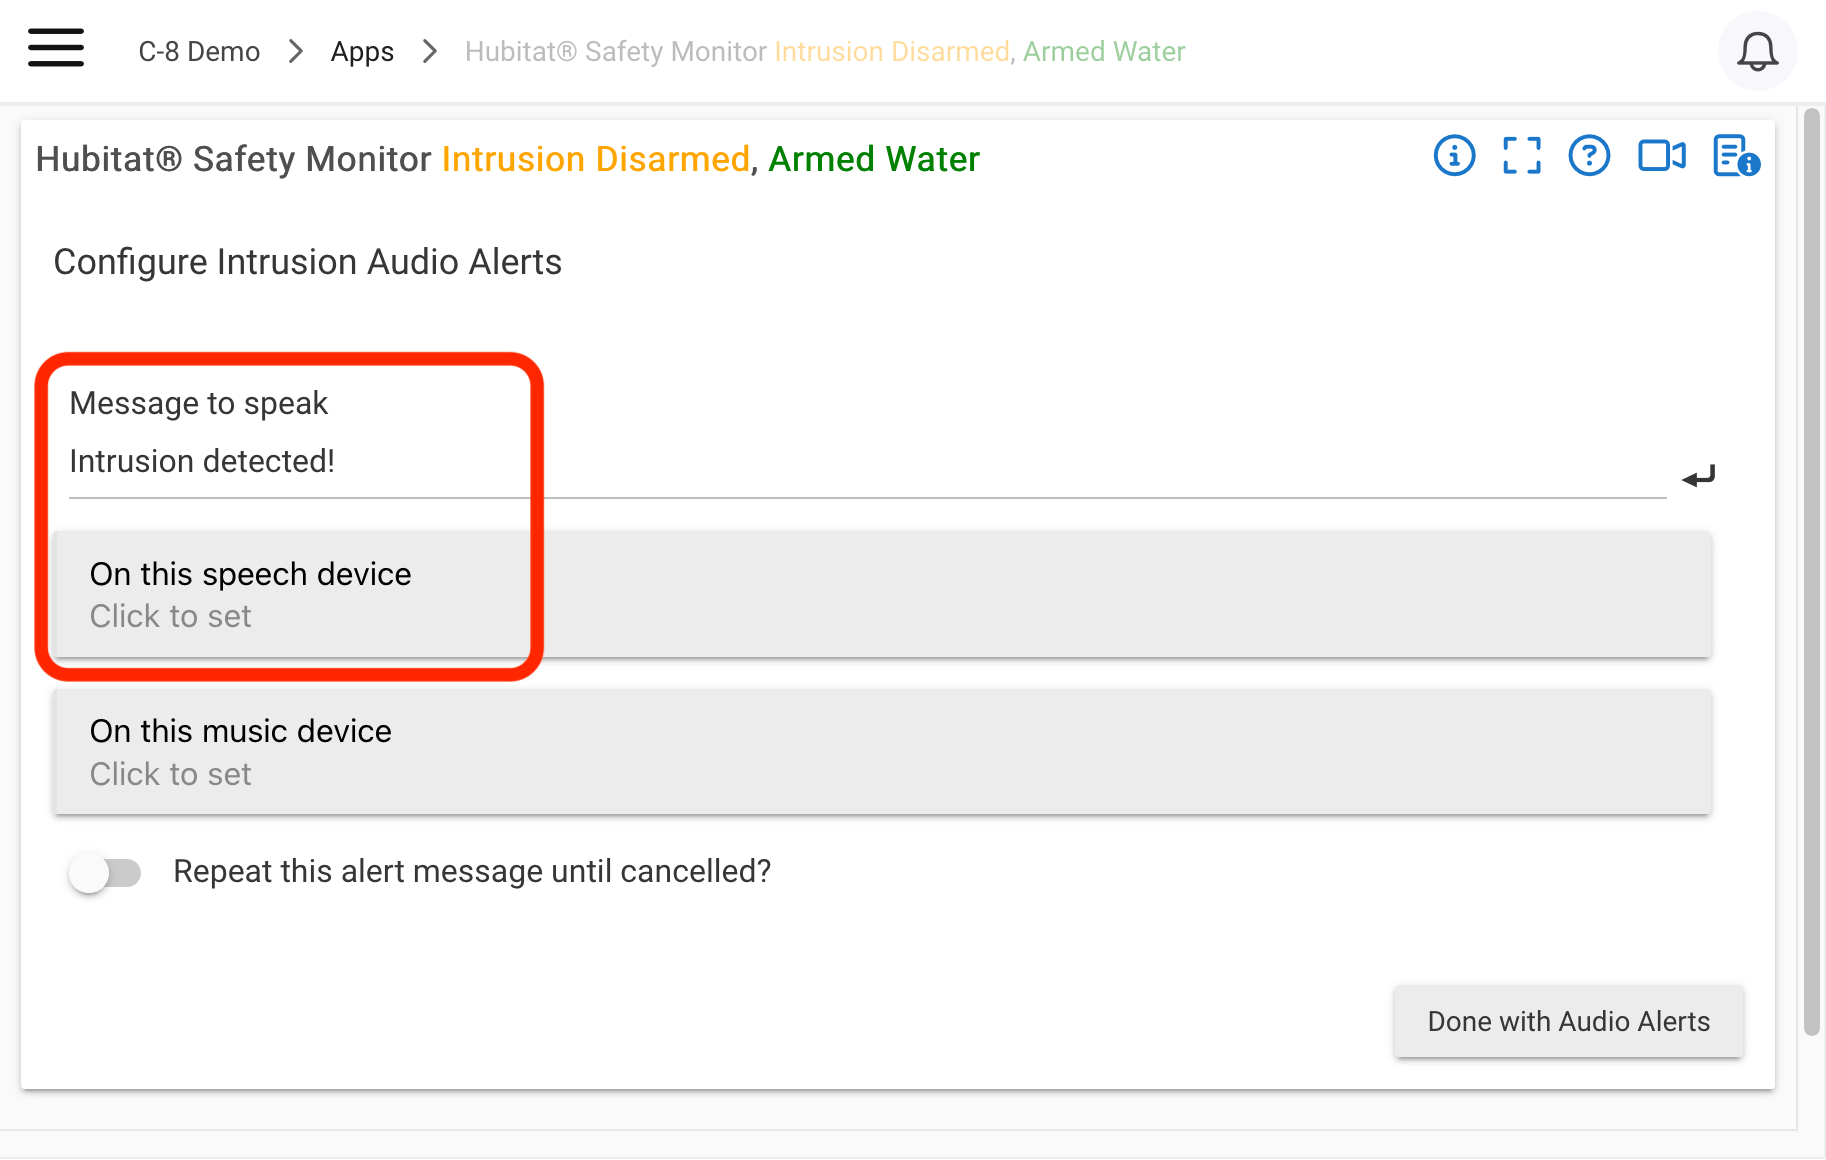
Audio Alerts
- If you have a speech device or speaker that can convert text to speech, you can configure them to act as alerts here. Start by entering your text in the Message to Speak
- Next, select the speech or music device(s) you want to send the message to. (The device must be able to perform this action; look for a "Speak" command on the device detail page, and test to see if it works there.)
- Select if you would like to repeat sending this alert message until the alert is canceled (in the same manner as other cancellation-required alerts, as described above). If so, enter the time in seconds you would like to wait between repeated messages.
- Click Done to save your Audio Alerts configurations.
Configuring Arming, Disarming and Cancel Options
When you have configured the Intrusion Alerts you want, select Done. After setting up an alert, you will notice a few differences in the Hubitat Safety Monitor details page. At the top you will see the current armed state in orange and below the Custom monitoring rules section, the configuration option Configure Arming/Disarming/Cancel Options is now available. Finally you will now see options for manually arming, disarming and changing your monitoring states.
How to Configure Your Arm/Disarm Settings
You can configure your home and away states to be armed automatically during certain modes or manually by using buttons. You can also set delays and designate buttons or switches to cancel alerts. Here’s how:
Select Configure Arming/Disarming/Cancel Options. There are five section on this page, each with their own settings:
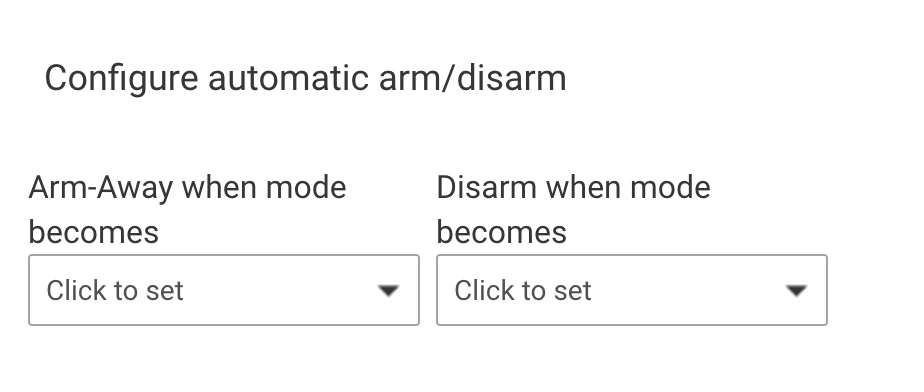
Configure automatic arm/disarm.
- If you would like your system to automatically arm itself during certain modes, you'll set that here. Use the dropdown menus to select which modes will arm your Away, Home and Night states. You can select multiple modes for each of these states. You can also select the modes that will disarm your Intrusion alerts.
- NOTE: If you set your system to automatically arm during a certain mode, it will not automatically disarm when that mode changes unless you configure automatic disarm modes also (or set some other method to disarm, e.g., a button device; or do so manually) — you must configure the complete automation you wish to create.
Use Delays for Arming or Alerts
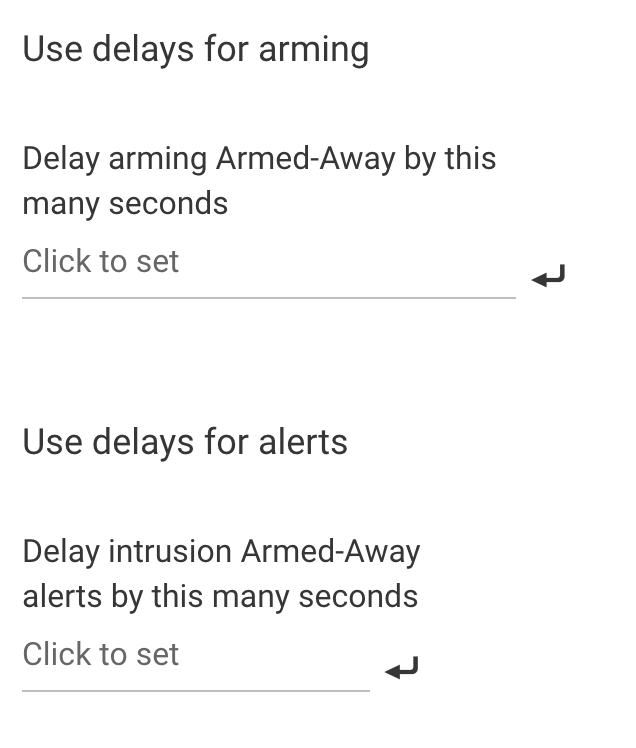
In certain cases, you may want to delay armed states or alerts. For example, if you arm your Away state using a button in your house, you may want build in a 20 second delay to allow yourself enough time to get out of the house before it is actually armed. Conversely, you can delay your alerts for a few seconds to give yourself a chance to disarm your system with a kill switch if you accidentally trip the alarm.
- To add the delay, simply enter the number of seconds you wish to delay the arming or the alert in the appropriate box.
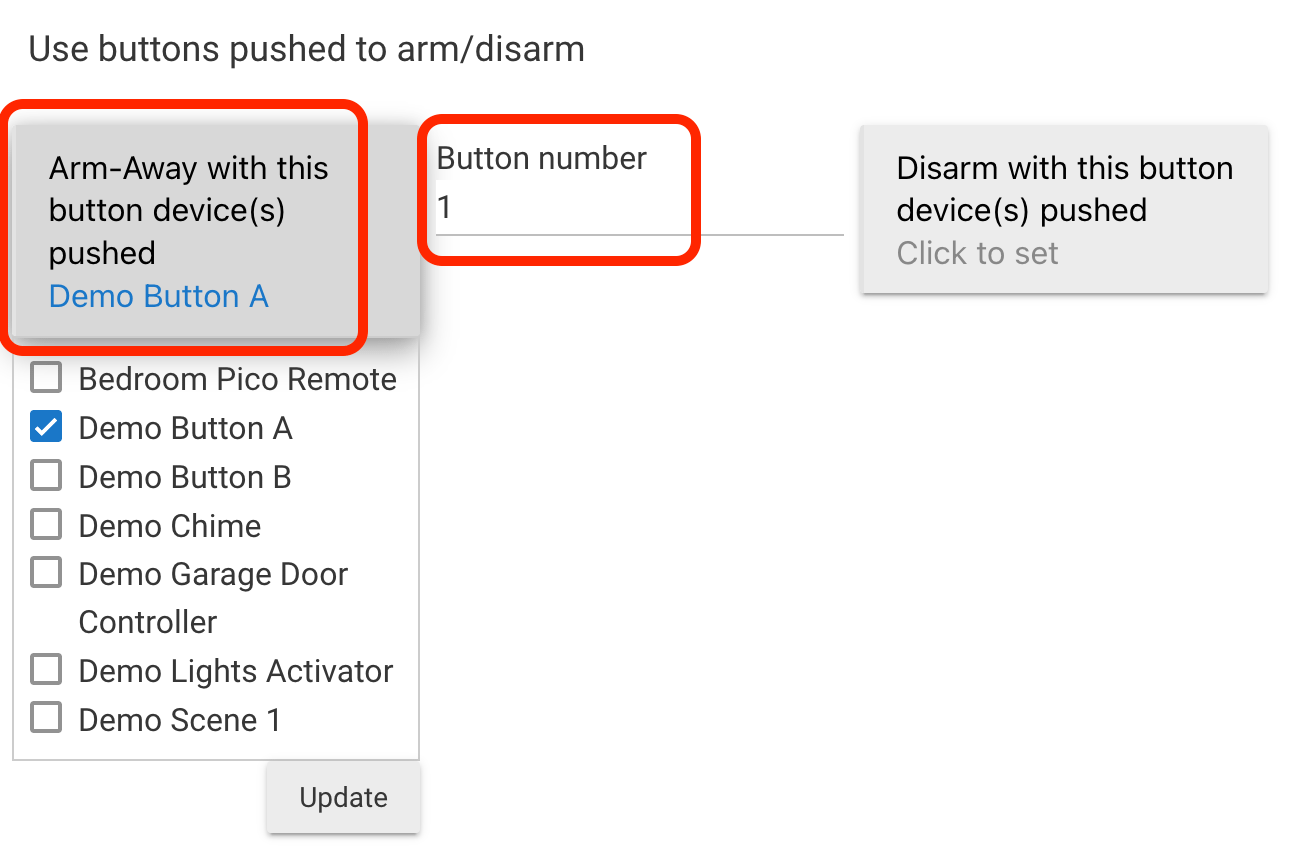
Use buttons pushed to arm/disarm
Buttons are a convenient way to manually arm or disarm your intrusion alerts. Many people keep a button by their bed to arm/disarm their Home alerts when they go to bed or wake up. Others use a hidden button near their door to arm/disarm their Away alerts.
- Use the designated check boxes to select the button devices you would like to use to arm your different states or to disarm the system.
- When you select your button device you will be asked to select which button number to use. If your button device only has one button, then enter 1.
Cancel Alert Options
Setting your Cancel Alerts Buttons or Switches is very important. First, if you set a delay for your intrusion alerts, you’ll want an easy way to cancel the alert before it triggers after the delay. Second, if your alerts are triggered (especially sirens), you’ll want a way to shut them off without having to go into the Hubitat Web Interface.You have a choice of canceling your alerts using buttons or switches. Select the buttons or switches you want to use to cancel your alerts.
- When you are finished configuring your arm/disarm options, select Done.
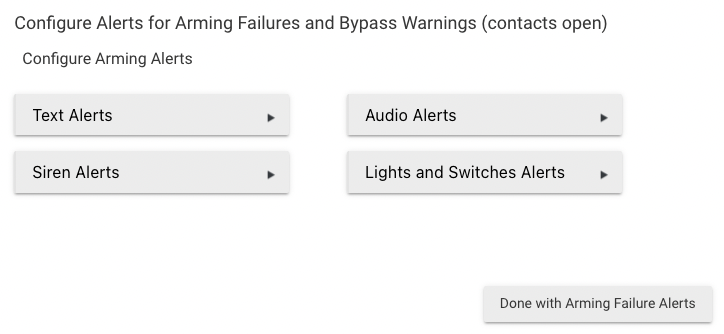
Configure Alerts for Arming Failures (contacts open)
Selecting an alert in this section will notify you if one of your contact sensors is left open when you try to arm your system. Setting up these alerts works exactly the same as configuring intrusion alerts.
- Choose from text alerts, audio alerts, siren alerts and lights alerts.
- When you are finished configuring your alert options, select Done.
Setting Custom Monitoring Rules
Custom monitoring rules allow you to get notifications for almost any change in your environment. Many people use this to get notified if indoor temperatures change to dangerous levels when away from home or when door locks are activated. Here's how to set it up:
-
In Hubitat Safety Monitor, select New Custom Monitoring Rule.
-
Name your Custom Monitoring Rule and select Continue.
-
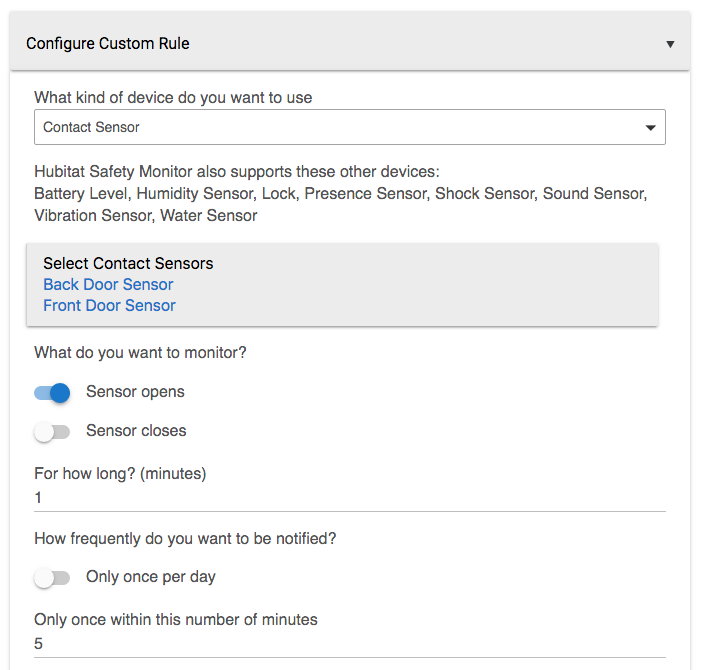
Select the type of device you would like to use to trigger your custom alerts. You can choose from:
- Temperature Sensor
- Contact Sensor
- Vibration Sensor
- Motion Sensor
- Humidity Sensor
- Shock Sensor
- Lock
- Battery Level
- Tamper Sensor
- Presence Sensor
- Sound Sensor
-
When you select a type of device, a list of options will appear. Select the specific device(s) you would like to monitor (some devices, such as battery level, give you a toggle switch to select all devices). Then select the specific states that will trigger an alert. This varies by device.
-
Next, select the type of Alerts you would like to receive. These options are exactly the same as you will find for setting Intrusion Alerts.
-
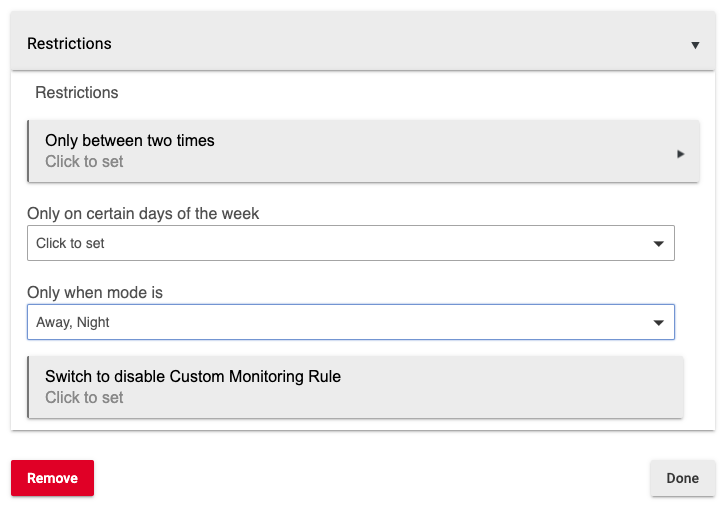
Custom alerts are not armed in the same manner as intrusion alerts. To arm your Custom alert, you can use the arm this rule button if you want it on all the time, or you can choose the restrictions link to select when it will be valid. Restrictions options include:
- Only between two times - these can be specific times or sunset/sunrise
- Only on certain days of the week - check any days that apply
- Only when mode is - select the modes for which you want this rule active
- These restriction may be used together. For example, the rule could apply only between Sunrise and Sunset on Tuesdays, during Day mode.
-
When your custom monitoring rule is complete, select Done.
-
You will see a new child app with the name you gave to your custom rule has now been added below the Hubitat Safety Monitor app. Use this link to edit your new rule.
Uninstalling Hubitat Safety Monitor
If you are using Hubitat Safety Monitor, it is not recommended to uninstall the app. However, with some extra effort compared to other apps, it is possible to manually do so if you no longer have a use for the app, its events, or related automations.
To uninstall, navigate to the App Status page for Hubitat Safety Monitor, and use the Remove Hubitat Safety Monitor button on this page. The app may be reinstalled (as above) if later desired, but all your settings must be reconfigured.