How to Troubleshoot Z-Wave
Slow Z-Wave network? Trouble including (adding) devices? Find some ideas here.
How to Troubleshoot Z-Wave
Having trouble with your Z-Wave network (slow devices, devices not responding, difficulty adding/including devices, etc.)? Find some ideas below to help.
Device will not add/include (or: how to do a general exclusion)
If you are having problems including (adding) a Z-Wave device to your hub, first try a factory reset of the device or a "general exclusion." Consult the device manual for specific instructions on how to reset or put the device in exclusion mode. If you no longer have these instructions, some of the most popular ones are documented in the list of compatible devices (see the Instructions column). A general exclusion can be done with any Z-Wave controller. To initiate a general exclusion with Hubitat:
- Connect to the hub and navigate to the Devices page in the sidebar.
- Choose Add Device in the top right corner.
- Choose Z-Wave, then choose Start Z-Wave Exclusion, and follow the exclusion process for your device.
- You will see "Unknown device excluded" (or the name of a specific device) appear on screen if a device was found in exclusion mode.
Then, try the inclusion process again. If the device still fails to pair or does not function after pairing, consider other possibilities below.
After any failed inclusion attempt, you will likely need to perform a general exclusion, as above, before the device will be able to be successfully included.
Failed inclusion and "ghost nodes"
If a device starts inclusion but does not successfully complete, it may leave an incomplete entry in the Z-Wave Details table. Additionally, if you force-remove a device from Devices instead of properly excluding it or reset a device (removing it from your network) without removing it from the hub, a "ghost node" may result. Either of these can cause problems, either problems in operation or adding new devices. To check for these nodes and remove them:
-
Connect to the hub and navigate to Settings from the sidebar, then open the Z-Wave Details page.
-
Look for any row in the table without anything in the Routes column and often without a link to a Hubitat device in the Device column; these devices may be "ghosts" (or at least have not had any traffic since the hub was rebooted and/or do not have a device associated with them in Hubitat).
- NOTE: Functioning devices are never "ghosts," and blank routes alone are not necessarily a problem.
- If you tried to add a device and it did not succesfully complete inclusion, the last device listed in the table is likely this failed inclusion attempt if it meets the above criteria.
- Mains-powered nodes are the most likely to be problematic than battery-powered devices, so pay particular attention to these devices in the list (switches, dimmers, smart plugs, and anything powered by mains, USB, C-Wire, or other devices with external power sources — anything that could be functioning as a repeater)
-
If you see a failed node or "ghost" you want to remove, select the Remove button (in the Status column) for that node. Wait several seconds for the page to reload, then verify that the device no longer appears in the table.
-
If you do not see a Remove button, select the Refresh button. Wait several seconds for the page to reload, then repeat step 3.
-
If you still do not see a Remove button, then:
- Try again; you may need to repeat the process once or twice before Remove appears (wait a minute or so between attempts, or longer); and
- Verify that the failed device is not actually "online." Assuming you know or can guess which device this might be, removing power from the device or performing a factory reset on the device may help (consult the device manual for how). The Remove option will not be presented if the hub hears back from the device on a Refresh.
TIP: Keep the "Logs" page (from the sidebar) open in another window/tab as you try the above. Any status messages from the Z-Wave radio will be logged as coming from "Hub."
Locks and other secure devices
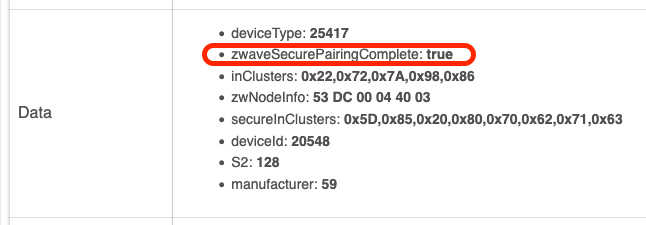
Barrier devices, including locks and garage door openers, usually must be paired securely and will not function if secure inclusion fails. To check if secure inclusion was successful, navigate to the device page, then look under Device Details in the Data section for zwaveSecurePairingComplete: true:
 {.align-right}
If you do not see the zwaveSecurePairingComplete field or if the value is false, try excluding the device and then pairing it again. Older locks in particular may need to be near to the hub for secure pairing to succeed (consult the device manual to see if the manufacturer recommends this), though most modern locks (or any device that supports NWI, Network Wide Inclusion) should not.
Range issues
Traditionally, Z-Wave is a mesh network. (Specifically, this means all Z-Wave devices except Z-Wave Long Range.) In a mesh network, some nodes (devices) "repeat" signals to/from the hub and other devices, extending the range of your network beyond what the hub alone can reach. If you are having problems using or pairing a Z-Wave device in-place, range could be a problem.
To help eliminate range as a possible problem, try bringing the device closer to the hub and trying the inclusion process again (or if the device has already been paired, see if it works better closer to the hub). Note that if a device cannot pair when in its desired location, the device will likely not work when the device (or hub) is moved back to its permanent location. You will likely need to add repeaters to strengthen your Z-Wave mesh.
What are repeaters?
Most non-battery-powered Z-Wave devices are repeaters. This includes hardwired devices or devices plugged into an outlet, like switches/dimmers, smart plugs, etc., as well as dedicated repeater devices. Battery powered Z-Wave devices are not repeaters. Repeaters help your network cover a larger area than the hub alone could reach. (Note that Z-Wave Long Range devices do not act as repeaters, as such devices do not use or participate in the traditional mesh topology.)
What range can I expect?
Z-Wave can use up to 4 hops between devices. The maximum range with 4 hops is roughly 600 feet (or 200 meters), but the placement of your hub and repeating devices as well as the layout of your home and surrounding environment will impact the actual range of your network. Therefore, you may still require Z-Wave repeaters even if all devices are within theoretical range of the hub.
Again, the above does not apply to Z-Wave Long Range. However, as you might expect from the name and the elimination of the mesh topology, it is designed to offer the possibility for direct communication to the hub over a longer distance. Theoretical range of up to 1.5 miles is possible per Silicon Labs' testing in ideal, line-of-sight conditions. However, as of the time of this writing — with such devices and controllers being relatively new — little real-world data on typical indoor (or outdoor) range is available. Still, it would be reasonable to expect it to be longer than traditional Z-Wave and adequate for most homes.
Chatty devices
Certain types of devices may generate lots of network traffic. Reducing congestion on your network may help resolve problems in such cases.
Power metering, energy monitoring, etc.
Some Z-Wave outlets, switches, dimmers, and similar devices have power, energy, current, and/or voltage monitoring features enabled by default. Depending on the use and nature of the connected load, this may cause high amounts of Z-Wave traffic. You can cut down on this congestion by disabling these features if they are not needed or tuning their settings to report only what you need.
To do this, look in the Preferences section of the device page for these devices. Look for options related to features that may be labeled with names like "power reporting," "electrical current reporting," and similar. The exact preferences you see will depend on the device and driver you are using. Here is one example, where the device is configured to report any time the power reading changes by at least 25 Watts (the other option would allow configuring a percent-based instead of Watt-based change with either or both being allows; again, your specific devices will vary):

Groups and Scenes
If you are having trouble turning on/off a Hubitat group or activating a Hubitat scene or Room Lighting setup that contains Z-Wave (or other) devices, the following options may help. They are available for your specific group or scene under Apps > Groups and Scenes:
- For groups:
- Enable on/off optimization: if enabled, will not send "on" commands to member devices that already report as on and will not send "off" commands to member devices that already report as "off" (may reduce network traffic, but may cause unexpected results if devices do not accurately report state to hub, so consider both possibilities).
- Enable metering: allows you to specify a delay, in milliseconds, between commands. Try enabling this option and specifying a delay; if you aren't sure where to start, try a value around 50 or 75, but you will need to experiment; results will depend on your network and devices.
- For scenes:
- Enable activation optimization: if enabled, will skip sending certain commands to device if device is already in the expected state (may reduce network traffic, but may cause unexpected results if devices do not accurately report state to hub, so consider both possibilities).
- Enable metering: allows you to specify a delay, in milliseconds, between commands. Try enabling this option and specifying a delay; if you aren't sure where to start, try a value around 50 or 75, but you will need to experiment; results will depend on your network and devices.
- For Room Lighting:
- Command devices on/off irrespective of reported state (Force): if disabled (default), will not send "on" commands to devices that already report as on and will not send "off" commands to member devices that already report as "off" (may reduce network traffic, but may cause unexpected results if devices do not accurately report state to hub, so consider both possibilities). This option is available under Means to Activate > Activate Lights Options > Additional Options.
- Activate even if already partially activated: If disabled (default), will not activate the lights (via activator device) if it believes they are already activated. For some circumstances, particularly where some of the automated lights are turned off independently of this app. Enabling this option will cause any means to activate to send commands for activation to all devices as specified in the table, regardless of the current device or app/Room Lights status.
Z-Wave S0
Z-Wave S0 (an older version of Z-Wave Security) can be significantly chattier than non-secure Z-Wave or newer S2 Security. For some devices, like older door locks or garage door openers that do not support S2, S0 is the only option. For many other devices, security is optional. Check the device manual to see if there is a separate method for secure vs. "regular"/non-secure pairing, and consider that pairing a large number of Z-Wave devices as S0 may cause congestion on your network, particularly if any such devices frequently send or receive messages on your network. S2 Security (supported on model C-7 and newer only) improves on this problem significantly, though some users still choose S2 only for specific kinds of devices.
To check if a device is paired with S0 Security:
- Navigate to Settings > Z-Wave Details and look for entries with "S0" in the "Security" column (hub model C-7 and newer only);
or
- On any device page, look under Device Details for the Data section.
- If you have a model C-5 or earlier and see a zwaveSecurePairingComplete: true entry, then the device is using S0; or
- If you have a model C-7 or newer and see zwaveSecurePairingComplete: true and S2: 128 entries, then the device is using S0 (other values for the S2 field or the lack of this field denote various S2 options or or no security)
Z-Wave Switch or Dimmer Status Not Updating
Some older Z-Wave switches and dimmers do not update their switch (on/off) status on Hubitat when turned on or off from the device itself (i.e., on the wall), including many made before 2016 but also some that remained on the market for years afterwards. This is due to a now-expired patent that many manufacturers chose not to license, affecting many "classic" Z-Wave (not Z-Wave Plus) switches and dimmers. To determine if your device is affected:
- In the Hubitat web interface, navigate to Devices and then to the device detail page for your specific switch/dimmer. Keep this page open (ideally on a tablet or laptop you can take with you to the device).
- Tap or flip the switch or dimmer on or off from the switch/dimmer itself (e.g., by pressing or flicking the paddle or toggle on the wall).
- While doing the above, look at the Current States section on the device detail page (opened in step 1). If the value of the
switchstate does not update to "on" or "off" to match the actual on/off state of the switch or dimmer (generally within a few seconds), your device may be affected.
Note that in contrast to the above, the switch state will usually update correctly if an "On" or "Off" command is issued directly from Hubitat. Thus, one solution is to send commands from Hubitat only rather than using the physical device. If you do rely on switch state on the hub (e.g., for use in Hubitat Dashboard or as a "trigger" for a rule or other app), then the built-in Z-Wave Poller app can be configured to periodically "poll" the devices—that is, request their state. Alternatively, if you do not rely on the switch state on the hub being necessarily accurate, you may simply ignore this quirk.
A note for users switching from other platforms: some platforms may have configured polling for you automatically, making you wounder why the switches behave differently on Hubitat. Hubitat allows you to choose if and how frequently you need this workaround. Generally, Z-Wave networks work better with less traffic. Polling creates more traffic. Keep this in mind as you make decisions about this issue.
If your switch does not appear in Z-Wave Poller, it likely is not one that could be affected by this problem. If you do not think this is correct, you may wish to match your model with the model and driver in the List of Compatible Devices to make sure the driver chosen is correct. (The driver is shown under the "Type" dropdown on the device detail page, opened in step 1 above.) Z-Wave Plus and Z-Wave Plus v2 products, also known as 500-series and 700-series products (and the upcoming 800-series), should not be affected by this issue—only Z-Wave series 300 and older.
Status not updating on the hub could also be due to other problems, like a weak Z-Wave mesh, preventing messages from getting back to the hub; or other network troubles (the rest of this document can help you identify them).
Z-Wave Details: Node Health, Topology, and Routes
The Settings > Z-Wave Details page contains diagnostic information that may be helpful for some users. This feature is not available on model C-5 or earlier hubs. The exact columns and other information will differ slightly based on hub model and which Z-Wave implenentation is used on your hub (legacy or Z-Wave JS). Information may include:
- PER: Packet error rate. Lower is better; 0 is good.
- Neighbors: The number of "neighbor nodes" (nodes in direct wireless range) that this node is able to see. More is better, but actual number will depend on the number and layout of devices in your network.
- Route Changes: Number of times the route has changed (fewer is generally better)
- RTT Avg: Round trip time average, the elapsed time between the sending of a packet and the receipt of an acknowledgment packet from the device (shorter is better)
- Msgs: Message count from device (excessively high values may indicate a problem)
- LWR RSSI: Calculated value of the RSSI for the last working route (LWR) over each hop, compared to the background noise sampling (higher values above 0 are better)
NOTE: Statistic related to routes and neighbors are not applicable to Z-Wave LR devices (node IDs over and including 0x0100 or 256), as they do not use a mesh topology.
Z-Wave Radio Firmware Update
Occasionally, new firmware for the hub's Z-Wave radio is released. If one is available for your hub, a Firmware Update button will appear in the row of buttons above the table:
It is recommended to apply any available updates, though they are optional and will only install if you start the process. (If you do not see this button, no updates are available.) We suggest reading the release notes or announcements in the News and Updates category in the Hubitat Community forum for more information on these updates.
Z-Wave Crash
Rarely, some users may experience a Z-Wave "crash." This may result a hub alert visible in the web interface (red circle over the system notification/bubble icon in the upper right). You may also simply notice odd symptoms like an empty Z-Wave Details table (when there are Z-Wave devices connected to your hub) or all Z-Wave devices failing to respond.
In this case, full restart of the Z-Wave radio may help. To do this:
- Navigate to Settings and select the Shut Down option.
- Wait until the LED on the front of the hub turns red, then unplug the hub from power for at least 30 seconds.
- Plug the hub back into power (the hub will automatically boot). Wait for the regular hub interface to become available again before verifying that your problem has been resolved.
Note that a regular reboot of the hub does not restart the Z-Wave radio.