Rule 5.1
Learn how to use Rule 5.1 to create Rule Machine rules. Rule Machine is the most powerful built-in option for creating custom automations in Hubitat.
Rule 5.1
Rule Machine is the most powerful built-in tool for creating custom automations in Hubitat Elevation. In short, it allows you to respond to one or more "trigger events" and perform an ordered set of actions in response. Features such as conditional actions — e.g., testing for a certain state and performing one set of actions or another, or nothing at all, depending on the result – allow further customization of rule actions, enabling you to create nearly any automation.
Tip: Rule Machine is very powerful but can be somewhat complex for new users. Before using Rule Machine, you may wish to consider if another built-in app (e.g., Notifications, Room Lighting, or Basic Rule for simpler custom automations) meets your needs.
Users of Button Controller 5 may also be interested in learning more about Rule Machine, as the actions, including conditional actions and repeats and other features, are nearly identical to that of Rule Machine.
Creating a New Rule
- Navigate to the hub interface, then select Apps in the sidebar.
- Select Rule Machine from the list. (Or install Rule Machine with Add Built-In App first if you have not already.)
- Select Create New Rule, then follow the prompts to provide a name for your rule. This is how it will appear in the Apps list and in logs.
- Specify triggers, actions, and other components you need to make your rule work as intended, as described below.
NOTE: Rule 4.1 and prior versions are found under the Rule Machine Legacy app, which is what the previous Rule Machine "parent" app has been renamed to. Rule 5.0 and newer versions are found in the "new" Rule Machine app. There is no need to change or "upgrade" (re-create) existing rules, whether Rule Machine Legacy or Rule 5.0; they will continue to function. New rules can be created only in Rule 5.1.
Anatomy of a Rule
The main rule page presents up to five components you can use in a rule:
- Use required expression: (optional, disabled by default) When specified, the rule will not trigger (see below) unless the required expression is true.
- Trigger events: When a trigger event happens, the "Actions to Run" will begin executing (except as described below).
- Create (or manage) conditions: Allows creating and modifying conditions that are used or can be used in conditional triggers or as part of expressions in an action. NOTE: Conditions do not do anything on their own; they must be used somewhere to have an effect.
- Actions to run: A list of actions to run when the rule is triggered — for example, turning on lights, changing a mode, or running just about any command on any device. There are also ways to use conditionals ("if then/else"), delays, repeats, and other features in actions, as described below.
- Local variables: Allows creating or modifying local variables that can be used in actions for this rule. Possible uses are generally similar to hub variables, except local variables are scoped to the rule in which they are created.
Most rules will minimally consist of trigger events and actions to run (note that rule actions will never run on their own unless the rule is triggered). A simple rule can be litle more than a "when this happens, do this" setup:
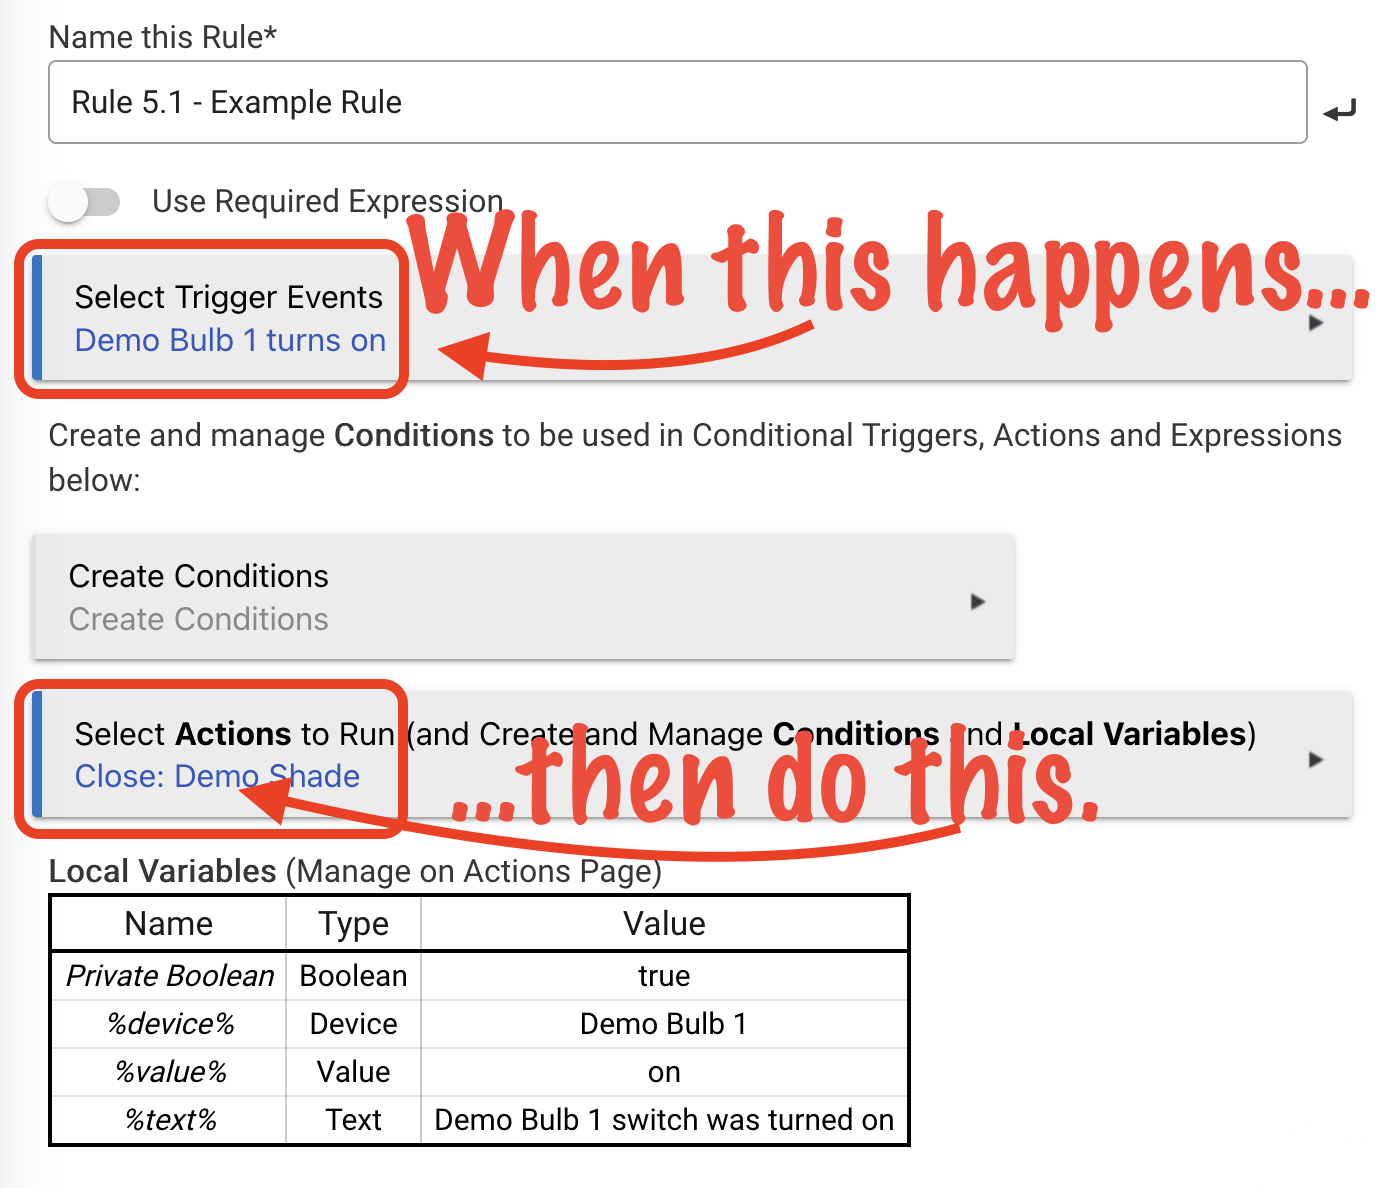
However, Rule Machine lets you create arbitrarily complex automations (including conditional actions, repeats, and additional features that enable more complicated automations).
The components of a rule (required expression, trigger events, and actions to run) are explained more below.
Required Expression
Enabling the Use required expression option allows you to define an expression (a single condition or any combination of conditions) that must evaluate to true in order for the rule to trigger. If the required expression evaluates to false at the moment when a trigger event happens (and before and resulting state changes are taken into account), the rule will not actually trigger — and, in turn, the specified actions will not run.
One possible use for required expressions is to trigger only on specific state changes. For example, if you want a rule to trigger only on a specific mode change — e.g., Away mode to Home mode — then a required expression is an easy way to make that happen:
Required expression: Mode is Away
Trigger events: Mode becomes Home
Without the required expression, this rule would trigger any time mode becomes Home, regardless of the previous mode. (Note also that the resulting state change from the trigger event is not yet taken into account, otherwise this rule would never trigger at all; this is what makes this feature particularly useful for capturing specific transitions.)
Another possible use for a required expression is to restrict the execution of actions under certain conditions (though this can generally also be done with conditional actions in "Actions to Run"; see below for more).
NOTE: Almost any condition can be used to create a required expression. However, local variables should not be used in conditions used to create required expressions (they do not generate events, and thus the required expression will not be re-evaluated when it changes). Hub variables and Private Boolean will work without caveats.
Rule Machine offers two additional options, both disabled by default, for required expressions:
- Cancel pending actions when required expression becomes false: if enabled, will not only prevent triggering (as above) but will also stop executing remaining actions in the rule — e.g., canceling delays/waits, etc. The rule will need to be re-triggered to execute any actions again.
- Evaluate required expression on system startup: will re-evaluate the required expression after a hub reboot or other startup. One possible use case is if any conditions in the expression use times or dates that may have been missed if the hub was offline at the time the evaluation would have changed.
Trigger Events
Each rule can have one or more trigger events specified. Events are generated by devices or by your hub itself. Examples of trigger events include "Motion sensor X is active" or "Time is 8:00 PM". Rules will listen for trigger events and run the "Actions to Run" when any trigger event happens (except in some cases when a required expression is used, as described below).
Rules can also be created without any trigger events. However, such rules' actions will run only when called by another rule or when run manually when viewing/editing the rule (with the Run Rule Actions button).
To specify a trigger event, open the Select Trigger Events page by selecting the Select Trigger Events box. Then, choose the "capability" that matches the kind of trigger event you want to add. For example, to trigger on "motion active," choose the "Motion" capability. To trigger on a switch (including a bulb or dimmer) turning on or off, choose "Switch." See the List of Trigger Event Capabilities section below for a complete list of capabilities and the attributes or events they correspond to.
The Conditional Trigger? option allows you to specify a condition that must be true in order for this trigger event to actually trigger the rule. You must create the condition on the Create Conditions or Manage Conditions page first. Conditional triggers will display with "- ONLY IF" plus the specified condition when shown in your list of trigger events. To disable a conditional trigger, un-select the Conditional Trigger: Trigger will only fire if Condition is true option. Conditional triggers are somewhat similar to required expressions, but note that:
- conditions for conditional triggers are evaluated after the trigger event (a required expression must be true before the trigger event)
- conditions for conditional triggers can consist of only a single condition, not an arbitrarily complex expression
- required expressions apply to the entire set of triggers (and typically remove the trigger event subscriptions when false), whereas each trigger can have its own condition (or not); regardless of conditions on triggers, a false required expression will still prevent triggering.
The And stays? option, also called a "sticky trigger," is option available for many types of trigger events. (If this option does not appear, that particular kind of trigger event does not support this option, generally events that do not relate to state changes.) For example, a trigger of Front door opens and stays that way for 0:05:00 will trigger only if the front door opens and remains in an opened state for 5 minutes. If the door is closed before that time, the rule will not trigger. When combined with conditional triggers, the condition is evaluated before the "and stays" duration (i.e., at the moment of the event itself, "front door opens" in this example). When combined with a required expression, the required expression must be true before the initial event (e.g., "Front door opens" — in order for the "and stays?" timer to start) as well as at the end of the "and stays?" time in order for the rule to actually trigger.
NOTE: multiple triggers in the same rule for the same event are, in general, not supported. For example, "level < 25" and "level > 75" on the same device will not work as expected, as Rule 5.1 is not designed with a mechanism to track different possibilities for the same attribute on the same device separately. (Two alternatives that will work: (1) a single trigger of "NOT level in range 25 to 75"; or (2) a
*changed*trigger with some test in the actions; among other possibilities.) Different attributes — for example, "motion active" and "temperature > 60" on the same device – are not affected. As of platform 2.4.1, multiple "stays" triggers for the same attribute name are supported if the attribute values are different, e.g., "contact open and stays open for 0:05:00" and "contact closed and stays closed for 0:01:00" on the same device.
Create Conditions/Manage Conditions
The main rule page as well as the Select Actions to Run page includes a Create Conditions or Manage Conditions section:

This allows you to create, view, and edit conditions used in conditional triggers, conditional actions, wait for expression actions, and other places where conditions can be used in your rule triggers or actions.
Creating conditions under Create Conditions or Manage Conditions does not do anything on its own. These conditions are available to use as described above — but they do not do anything unless they are used somewhere.
NOTE: Conditions that are not used as described above (and therefore do not have any effect on the rule) will be noted with "(unused)" in the list.
A similar option appears in the Define Required Expression page, and the same applies (although these two "banks" of conditions are separate and only available in required expressions or conditional triggers and actions, respectively).
Editing expressions
An expression may consist of one condition or multiple conditions combined in various ways, for example "Switch 1 is on AND Switch 2 is on." Expressions are used in actions such as "IF (expression) THEN" and "Waitf for expression."
To edit an expression, either edit the individual conditions (in "Manage Conditions," as described above), for example, to change "Switch 2 is on" to "Switch 3 is on"; or add or remove a particular expression element (condition or operator), such as "Switch 2 is on" or "AND." The expression editor itself cannot edit individual conditions, only create new conditions or replace one with another. (If making many changes, it may be easiest to use the option to erase the expression and start building it like new.)
Actions to Run
This is where you define what happens when the rule is is run. To add an action, first select the "+" button at the bottom of the (now empty) actions table to create a new action. Then, choose the appropriate category for the action under Select Action Type to add. Finally, choose the specific action under Select Which Action. Many actions will present additional options to configure the action after this point, but options will vary by action. Most actions run a command on a device. For example, Set Dimmers and Bulbs > Set dimmer can be used to set the level (brightness) on a dimmer or bulb. Rule Machine will ask you for a level (required) and, optionally, a transition time. Under the hood, this calls the "Set Level" command on the device, but you do not need to know this; Rule Machine handles running commands on devices as needed based on your selections here.
See the List of Actions section below for a complete list of where to find any particular action in the action menu structure.
Actions to run are essentially an ordered script. You can add as many actions as you need in whatever order you want. Note that some "special" action lines like IF (expression) THEN and Repeat have specific formats that must be followed; see below for more details on these.
Modifying Actions
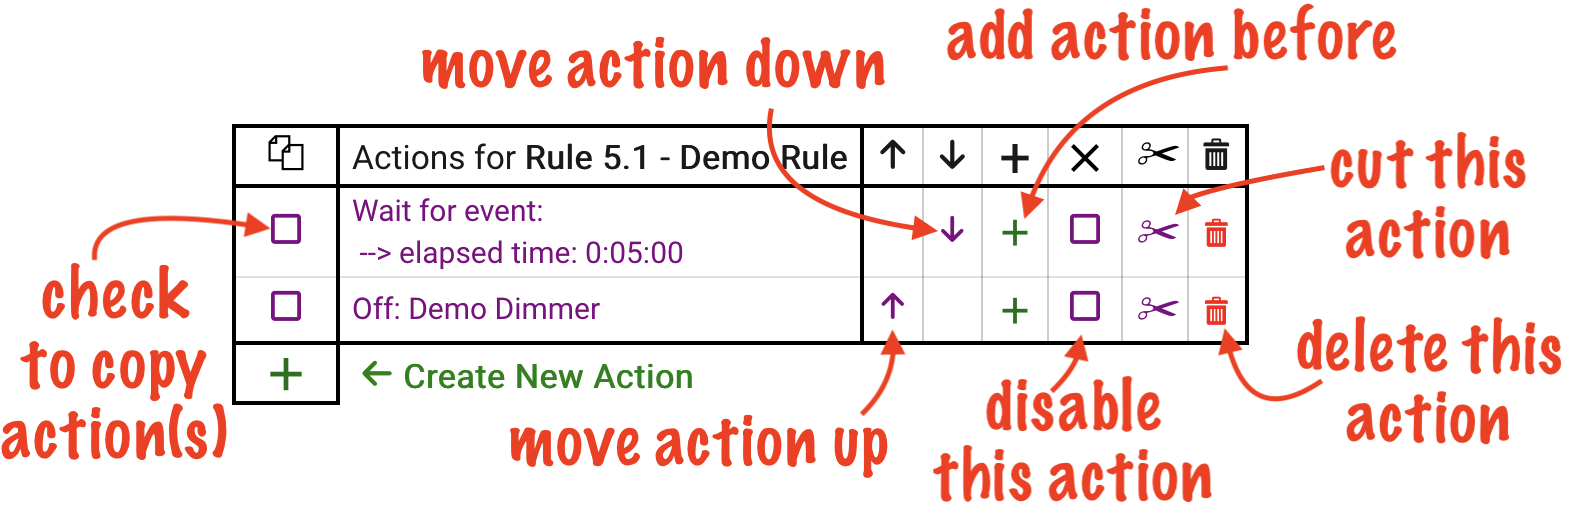
On the Select Actions to Run page, the actions you've added to the rule are shown in a table format. Click/tap an action in the table to edit the action — for example, to change the selected device or other selections. Actions can easily be moved by using the up or down arrows in the cells next to the action. To insert an action before an existing action, select the "+" icon next to that action. To insert an action at the end of the list, select the "+" button at the bottom of the table (like you did to create your very first action).
To delete an action, select the trash can icon next to the action. To disable an action, check the box in the "X" (disable) column for that action. Disabled actions will be shown in an red, italic typeface. They will be skipped when the rule actions are run.
Cut/Copy/Paste
Actions can be cut/copied and pasted with in the same rule or between different rules.
To copy an action, select the checkbox to the left of the action in the table, then select the copy icon at the bottom left of the table (to the left of the "⬅ Copy Selected Actions To Clipboard" text). You may copy more than one action at a time — just check any number of boxes. If you select multiple actions, they will be copied to the clipboard in the order they are selected (not necessarily the order they appear in the actions list).
To cut an action, select the scissors (cut) icon in the same row as that action. A cut action will be removed from the actions list and added to the clipboard; a copied action will remain in the list and be added to the clipboard.
To paste an action into the same rule, either select the paste icon at the bottom of the table to paste the copied action(s) at the end, or select the paste icon in the row next to any action to paste the copied action(s) before that action. Actions remain on the clipboard after cutting or copying and can be pasted again and again anywhere in the rule as desired. Use Clear Clipboard to remove all actions from the clipboard if needed.
To cut or copy actions from one rule to another:
- Cut or copy the actions to the clipboard of the original rule, as described above.
- Still in the original rule, toggle the Publish Clipboard? option to enabled.
- Open the other rule and navigate to its Select Actions to Run page. Choose the original rule from the Import Clipboard From... dropdown. The copied actions from the original rule are now available in the current rule's clipboard and can be pasted as normal anywhere in the actions.
- If you do not see Import Clipboard From..., ensure the clipboard in the "new" rule is empty (select Clear Clipboard if needed). If the rule's clipboard is empty and you still do not see Import Clipboard From..., reload the page.
- Optional: you may wish to return to the original rule and turn off Publish Clipboard? when you are done (it will remain in the Import Clipboard From... dropdown for all rules until disabled, so this may make it easier to find other rules in this list in the future).
- Each rule maintains its own clipboard. Clearing or copying additional actions to the clipboard of either rule after importing will not cause any changes in the other rule (changes made to the original rule after enabling publishing but before importing will be reflected in the import)
TIP: To delete, enable/disable, cut, or copy multiple rule actions at the same time, the fastest method is to select the corresponding icon in the top/header row of the actions table (e.g., the trash, "X," cut, or copy icon in the top row). A drop-down list of actions will appear, with checkboxes next to each action. Check the desired actions, then click/tap anywhere outside the dropdown. Your changes will be saved immediately (e.g., actions will be deleted, copied, enabled/disabled, etc. as soon as you close the drop-down).
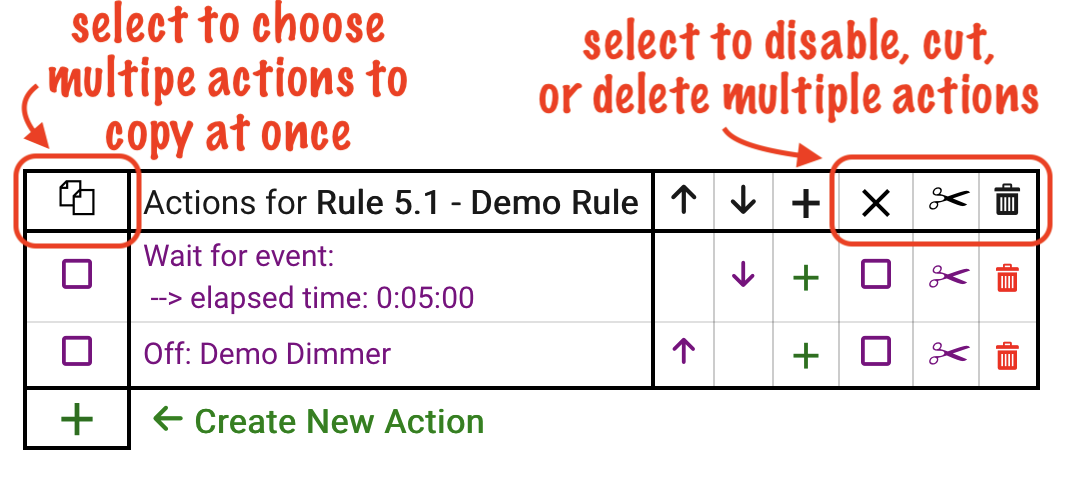
This may be faster for you than performing these tasks on individual actions.
Local Variables
See Local Variables under Special Features below.
Special Actions
Most Rule Machine actions run commands on devices. For example, Control Switches, Push Buttons > Turn switches on/off will send an "On" or "Off" command to the selected device(s), depending on the options chosen. Toggle switches will turn the switch (or dimmer, bulb, etc.) off it it is on or on of it is off. However, Rule Machine also contains various types of special actions, like delays and repeats.
Conditional Actions
Rule Machine offers two types of conditional actions:
IF (expression) THEN
The most powerful option is the "full" conditional action you can get by selecting IF (expression) THEN. Any action between this action and END-IF, which must be used to indicate the end of your block of conditional actions, will be executed only if the provided expression is true when the IF (expression) THEN line is reached. For example:
IF (Living Room Dimmer is on) THEN
  Dim: Living Room Dimmer: 50%
END-IF
The "Dim..." action will be reached only if the Living Room Dimmer device is on when the IF...THEN line is reached. If not, the rule will proceed to the next action after the END-IF. You can put multiple lines of actions between the IF...THEN and END-IF. You can also use ELSE and ELSE-IF to create more complicated flows. These work similarly to conditional logic in most programming languages. Here is a more complicated example:
IF (Living Room Dimmer is on) THEN
  IF (Mode is Day) THEN
    Dim: Living Room Dimmer: 75%
    On: Kitchen Lights
  ELSE-IF (Mode is Night) THEN
    Dim: Living Room Dimmer: 25%
    Off: Kitchen Lights
  ELSE
    Dim: Living Room Dimmer: 50%
END-IF
(Note that these are only examples of how to create rule actions and may appear somewhat contrived to demonstrate possible structure; we are not considering what might trigger this rule.)
Simple Conditional Action
A simple conditional action is an expression that can be "attached" to a single action, and that action will only run if the condition is true. Our first example above could have been re-written using the Simple Conditoinal Action option as:
IF (Living Room Dimmer is on) Dim: Living Room Dimmer: 50%
Unlike "full" conditional actions, a simple conditional action allows only a single action to run when the condition is true. It also does not provide a way to specify alternate flows if false.
Operators
The AND, OR, XOR, and NOT operators are available for use when building expressions. AND, OR, and XOR are evaluated from left to right with equal precedence. NOT applies to the item immediately to the right. Parentheses, ( and ), can be inserted using the editor to create sub-expressions. Sub-expressions are evaluated first (with the innermost sub-expression being evaluated first if nested sub-expressions are used). The meaning of these operators is the similar to the logical operators in most programming languages:
AND: returns true if both operands are trueOR: returns true if either operand is true (or if both are true)XOR: returns true if exactly one operand is trueNOT: returns true if the operand is false, or false if the operand is true
If Display current values is enabled, the editor (and logs) will show the evaluation for individual conditions as T or F in parentheses immediately following the condition and the final evaluation for the entire expression as TRUE or FALSE in parentheses after the expression.
As an example, an expression that reduces to T AND F will evaluate to FALSE, whereas T OR F will evaluate to TRUE.
Delay
Rule Machine has two types of delays. A delay can be added as a special type of action under Delay, Wait, Exit or Comment > Delay Actions (or Delay Actions Per Mode to specify a different delay for each mode). This causes the actions to effectively pause at the delay, wait for the specified amount of time, then resume with the next action when the time is up.
Alternatively, with most actions, a delay option can be specified on the action itself. To do this, select an option from the Delay? drop-down when creating or editing the action. Choose hrs:min:sec to specify a specific amount of time, or choose variable to use a local or hub variable (must be of type number or decimal). With this type of delay, the delayed action is scheduled for the specified time into the future, then execution immediately continues with the next action.
For any delay, the Cancelable? option may be selected. By default, a rule being re-triggered (or the rule actions running again for any reason) does not cancel previously scheduled delays. Choosing the Cancelable option allows the delay to be cancelled with the Cancel Delayed Actions action elsewhere in the same rule, but this must be done explicitly.
The Cancel Rule Timers actions will also cancel delayed actions (and can be called on the rule from any rule, not just the same rule), but it affects all rule timers, not just delays. It will also cancel delays with or without the Cancelable? option selected.
Care must be taken when using delays embedded inside conditionals. If the rule re-triggers while the delay is pending and a delay inside a nested conditional is reached (as of platform 2.3.8.186, top-level conditionals are no longer a problem), you may see a "Multiple simultaneous rule execution error" in Logs (and the rule actions will not run as intended). Solutions include restricting execution of the rule while the delay is pending (e.g., with a required expression), cancelling the delay earlier in the rule, using a "Wait for events: elapsed time" action instead if you want the timer to be cancelled on re-trigger of the rule, or creating separate smaller rules instead of one larger rule that work together to achieve your automation. (Advanced discussion of rule/app state and simultaneous or re-entrant execution can be found in the forum; for the vast majority of users, this level of detail is not of concern.)
Wait
Rule Machine offers two types of waits under Delay, Wait, Exit or Comment: the Wait for Events action and the Wait for Expression action.
Wait for Events
Wait for Events allows you to specify one or more events and cause the rule to effectively pause action execution at this point.
The rule will wait for the specified event to happen if only one event is specified, then proceed with the next action. If multiple events are specified, the rule will wait for any of the specified events to occur and proceed unless the All of these? option is selected in the editor, in which case execution will proceed with the next action once all of the devices are in the specified state.
To add more than one event to wait for, select Add another Wait Event after adding the first (or any subsequent) event. When you are finished with everything, select Done with Wait Events to return to the previous page to add or edit other actions.
Note that this action waits specifically for events and does not evaluate any device states at the time when the action is reached; compare with "Wait for Expression," below.
Additional options on Wait for Events include:
- Timeout?: allows you to specify an amount of time after which the rule will proceed with the next action in case none of the specified event(s) happen.
- And stays?: requires the condition resulting from the event to remain true for the specified amount of time before continuing. If the event happens but the resulting state does not remain true for the specified time, the rule will continue to wait.
Wait for Expression
Wait for Expression allows you to specify a condition or combination of conditions (i.e., an expression). If the expression is true when this wait is reached, the rule will immediately proceed with the next action (unless a duration is required; see below). If it is false, the rule will effectively pause at this point and wait for the expression to become true.
The Timeout? option allows you to specify an amount of time after which the rule will proceed with the next action in case the specified expression does not become true before that amount of time passes. The Use Duration? option allows you to specify a Duration, an amount of time for which the expression must remain true in order for rule to proceed to the next action. (Note that the duration begins at the time when the action is reached, so in the case of expressions that are already true, the time of any preceding events is not relevant.) If a duration is specified and the expression becomes (or is) true for some amount of time less than the duration and then becomes false again, the wait will start over.
Cancellation of Waits
Any type of "Wait" action is cancelled upon re-triggering of a rule. (The Cancel Rule Timers action will also cancel waits but is rarely necessary, and it affects all rule timers, as described elsewhere.) Note that this behavior differs from delays, which must be explicitly cancelled.
TIP: Using Wait for Events with Elapsed Time chosen as the capability is a particularly handy method of delaying actions. Unlike the Delay action (or the Delay? option on an action), waits are cancelled when the rule is re-triggered without any additional configuration required. This can save a couple clicks compared to a "delay" if this is the desired outcome. (Note: the Elapsed time option is not available if other events have already been selected. But in this case, it is effectively equivalent to setting a timeout on that wait.)
Note that "cancelation" means that the delay or wait will be removed and that action execution will not proceed to the next action but rather exit.
Exit Rule
Exit Rule causes the rule to ignore any actions after the "Exit Rule" action is reached (i.e., execution will be treated as as if this line were the last of the actions to run). "Exit Rule" does not cancel any repeats, delays, waits, or other scheduled actions that may have already been created by previous actions.
This action is generally most useful if used as part of a conditional action. For example:
IF (Mode is Night) THEN
  Exit Rule
END-IF
// remaining actions to run only in modes besides Night...
Comment
The Comment action allows you to write a note, or "comment," at that location in your rule actions. It is ignored during execution (though it will generate a log entry for the comment if action logging is enabled). A typical use is to document for yourself why you have used a certain rule action at that point in the rule, which may make future editing or debugging easier.
Comments will be displayed with double-slashes (C++-style) at the beginning of the line in the Actions to Run list.
Repeat
Rule Machine offers two types of repeats: Repeat Actions and Repeat While Expression. The block of actions to be repeated must be terminated with an END-REP or Until, thus enclosing the set of action(s) to be repeated. See below for examples.
You must specify the time interval for the repetition, presented as the Repeat every... option when creating the repeat. As an example, if you choose 5 minutes, this set of actions will repeat every 5 minutes (i.e., the actions between the Repeat... and END-REP will execute once, wait until this interval passes, then execute again, etc.). Be careful not to make this interval too short, as you can consume your hub CPU resources by repeating too quickly.
Some method to stop the repetition is required. One option is the Repeat n times option, which will stop the repeat after n repetitions. Alternatively (or additionally), if the Stoppable? option is selected on the Repeat..., then a Stop Repeating Actions action elsewhere (often in the other half of an IF THEN/ELSE inside the repeat) will stop this repeat when called from elsewhere in the rule. As an alternative, Cancel Rule Timers from either the current rule or another rule will stop all repeats (and other rule timers), regardless of whether this option is selected.
Rules may have more than one block of repeating actions. However, nesting one repeat inside another is not supported.
Examples of Repeats
NOTE: These examples demonstrate the general format of a repeat but not any options described above that you must (e.g., "repeat every...") or may (e.g., "repeat n times") choose when creating a repeat.
With Repeat Actions:
Repeat Actions
     some actions...
END-REP
With Repeat While (Expression):
Repeat While (Expression)
  some actions...
END-REP
The above is equivalent to a simple conditional on a Repeat Actions, which was the only option to create such a repeat in Rule 5.0 and prior (and still works):
IF (expression) Repeat Actions
     some actions...
END-REP
The following can also be logically equivalent:
Repeat Actions (stoppable)
     some actions
    IF (expression) Stop Repeating Actions
END-REP
or:
Repeat Actions (stoppable)
  IF (expression) THEN
    Stop Repeating Actions
  ELSE
    some actions...
  END-IF
END-REP
Repeat n times (like a "for loop"):
Repeat Actions n times
     some actions...
END-REP
A repeat can also be terminated with a Repeat Until Expression (which displays as Until... in the actions list):
Repeat Actions
     some actions...
Until (expression)
Unlike Repeat While (Expression) ... END-REP, this repeat will always happen at least once and will stop repeating if the expression is true when the end of the repeat is reached.
Ping
Rule Machine includes an action that can ping an IP address (under Send, Speak, or Log a Message, Send HTTP Request). This sets the built-in text variable to the response results of three ping attempts and the built-in value variable to the packet loss or 100 if no response. (See above on how to use built-in rule variables.) A possible example of its use:
Ping 8.8.8.8
Set myVariable to %value%
IF (myVariable = '100') THEN
  Log: "No response from ping"
END-IF
Track Event Switch/Dimmer
The Turn switches on/off and Set dimmer action provide options including Track event switch or Track event dimmer. This is an option that can be enabled as an alternative to manually specifying the on or off state (for a switch) or a level (for a dimmer); instead, the value to which the device will be set will be that from the last switch (for Track event switch) or dimmer/level (for Track event dimmer) event that triggered the rule.
Control Hubitat Safety Monitor
While Hubitat Safety Monitor (HSM) has many options built in to automate arming and disarming, the "Control Hubitat Safety Monitor" action in Rule Machine allows you to control HSM from Rule Machine rules as well. Possible actions are:
- Arm Away, Arm Home, Arm Night: set HSM to Armed-Away, Armed-Home, or Armed-Night
- Disarm: Disarms Armed-Away, Armed-Home, or Armed-Night. Arms water and smoke/gas/CO (if set up).
- Disarm All: Disarms all of HSM, including Armed-Away, Armed-Home, or Armed-Night, and water, smoke/gas/CO, and custom monitoring rules
- Arm All HSM Rules: Arms all custom monitoring rules in HSM (does not arm to Away, Home, Night, water, or gas/smoke/cO)
- Cancel All Alerts: Cancels any ongoing alerts in HSM (e.g., repeated notifications from an armed intrusion)
- Arm HSM Rule, Disarm HSM Rule: Arms or disarms a specific HSM custom monitoring rule Cancel HSM Rule Alert: Cancels any ongoing alerts (e.g., repeated notifications) resulting from a custom HSM monitoring rule
Custom Action
Most Rule Machine actions run specific commands on a device. For example, the Set Dimmers and Bulbs > Set Dimmer action runs the Set Level command on a device (and passes the level and optional fade time as parameters).
If you want a Rule Machine action to run a command on a device that is not available via built-in Rule Machine actions, the Set Variable, Mode or File, Run Custom Action > Run Custom Action action can do that. Select this action, then choose the device (by either choosing a capability the desired device supports and then finding it in the list or using "Last Event Device," which will apply to the last device that matched a trigger event), and finally, choose the command to run. Optionally, specify one or more parameters. The Device Detail page for the device displays all commands at the top of the page and will show you what, if any, parameters are optional or required.
Run Rule Actions
The Run Rule Actions action can be used in one rule to run the actions of another rule. Note that this is not identical to a triggering of the other rule. For example, the actions will be run regardless of any required expression, unless the Cancel pending actions when required expression becomes false? option is turned on, in which case the actions will not be run.
Others
Rule Machine is arbitrarily powerful, and there will always be things it can do that you won't find an example of. For questions, the Hubitat Community is a great resource!
Rule Options
Each rule has options for Logging:
Logging Options
- Events: logs any time a trigger event happens. The log entry will contain the name of the rule and a description of the event (e.g., "My Rule event: Side Door Lock unlocked)
- Triggers: logs any time the rule was triggered (e.g., "My Rule Triggered")
- Actions: writes a log immediately before each action in the rule is run (or also if it was skipped — for example, because it is inside a conditional action that evaluated to false)
These options can be useful for troubleshooting. All log entries will appear in Logs.
Other Rule Options and Features
-
Display current values: if enabled, the current value for any selected device attributes, variables, etc. will be displayed next to the device the list of trigger events and actions to run. These values will also be displayed with the actions in "Logs" if action logging is enabled.
-
Ignore trigger events while running: after a successful trigger, will ignore any additional trigger events until after either: the final action in the List of Actions to Run is reached, an Exit Rule action is run, or Cancel Rule Timers is run against the rule. (Additional discussion: https://community.hubitat.com/t/rm-feature-request-prevent-rule-from-triggering-if-already-running/137609) NOTE: This feature was available only in platform 2.3.9, though existing rules using the option will continue to function as before (this feature is intended to work as described above but has unexpected outcomes for some users; that behavior will not be changed). We suggest an alternative, such as Private Boolean and conditional triggers, conditional actions, or a required expression, to achieve the specific outcome you want.
-
Run Actions button: will execute the Actions to Run section (often useful as a way to test actions, without needing a trigger event to happen)
-
Update Rule button: re-initializes rule like Done but without leaving the rule editor page
-
Remove button: removes this rule. Note that the Remove button inside a rule removes only that rule; the Remove Rule Machine button inside the "parent" Rule Machine app will remove Rule Machine itself and all rules.
-
Done button: re-initializes rule (updates trigger event subscriptions; cancels any timers/scheduled jobs), then returns to the Apps list page. Note that changes inside the "Select Actions to Run" page are saved as they are made and do not require use of this button.
Rule Machine rules also offer two features (at the top of the main rule page) to pause/resume or start/stop a rule:
- Pause: Will prevent actions from running in response to trigger events and, if the rule actions are currently running, will pause at the current location until resumed.
- Resume: Un-does these changes, i.e., trigger events will now cause the rule to run actions like normal. If the rule actions were in progress when paused, will also resume at the then-current point.
- TIP: Rules can be paused and resumed from other rules via rule actions (not just manually via these buttons).
- Stop: Stops running rule actions and removes all schedules and subscriptions. For all practical purposes, this makes the rule as if it had never been initialized (via Done or Install Rule) in the first place, though the rule will remain installed.
- Start: Re-initializes rule (re-creates trigger event subscriptions or schedules, etc.). The internal state of the rule will be "reset" to resemble a newly installed rule, including resetting Private Boolean to true.
Special Features
Local Variables
Rule Machine allows you to create local variables in each rule. These function similar to hub variables, except they are only available for use inside the specific rule where they are created. (Users of older Rule versions may recall global variables, which have effectively been replaced by hub variables and are also usable inside Rule Machine.)
Use the You can create and manage Local Variables below table at the bottom of the Select Actions to Run page to create, edit (select the value to edit the value), or delete local variables. (You can also view, but not edit, local variables from the main page of the rule.) Data types, naming restrictions, and in-rule usage possibilities are generally similar to those for hub variables.
Rule Machine allows the use of local variables (and hub) variables in certain UI actions. For example, if you have a local variable named MyVariable, you can can use the string %MyVariable% in many string inputs to substitute the value of the variable. This works with any action under Send, Speak, or Log a Message, Send HTTP Request, including Send/Speak a Message, as well as when setting the value of String variables. Many actions will also offer the option to use a variable for a specific value, e.g., Set Dimmer has a Variable level? option that can be enabled to specify a variable to use for the level.
Rule Machine also has a few "built-in" variables local to each rule that refer to the last device event, usually the most recent trigger event (except as below, or if the trigger was not a device — a schedule, a hub/location event, manually running rule actions or running from another rule, etc., in which case these variables are not guaranteed to have a specific value). These can be referred to in string inputs using:
%device%: name of the device that generated the most recent matching trigger event, except:- set to
"timeout"after a "Wait..." action if a timeout is specified on a wait and the next action is reached because the timeout expires - not necessarily set to any value if the triggering event does not have a device (e.g., location events or periodic triggers)
- set to
%value%: the value of the event (e.g., could be "off" for a switch)%text%: thedescriptionTextproperty for the event (as provided by the driver, often in a format resembling "Living Room switch is off"; this value is not required, and not all drivers may provide it)%date%:the date the event was generated%time%: the time the event was generated%now%: the current time (this value is always available and not related to any specific trigger or event)
Setting Variables
Rule Machine offers a Set Variable action under Set Variable, Mode or File, Run Custom Action that can be used to set the value of a hub variable to a specific value or using various "operations" (e.g., "variable math" to perform a mathematical operation on two variables and use the result as the value to set; "device attribute" to set a variable of a matching type to the current value of any device attribute; and others).
Notes on specific operations:
- "Token" (string operation): Splits the "String to get token from" using "Delimiter" as the delimiting expression (the delimiting expression itself will not appear in the output). The delimiter is a regular expression (regex), not a literal string. If you are unsure of the format required for regular expressions, we suggest searching the web with terms like "Groovy regex" or "Java regex" (internally, this operation is performed using the Groovy
split()method on the original string).
Private Boolean
Private Boolean is a built-in boolean variable available to each rule. A boolean variable is one that has two values, here true or false. It functions similarly to a local boolean variable, except:
- you do not have to create it; it is already part of every rule (the default value is
true) - it can be modified via other rules, not just the same rule (and is modified differently from "regular" variables, using the actions under the Set Private Boolean, Run/Pause/Cancel Rules action category)
- it can be used as part of a required expression
Private Boolean does not do anything on its own; it is used only if and how you use it in your rule(s).
Frequently asked questions
Why didn't my rule run?
Try enabling logging as described in the Rule Options section. Then, use "Logs" in the sidebar to see what, if anything, your rule did and when. (Note that you'll need to use the "Past Logs" option on this page unless you had "Current Logs" open at the time the log entry was generated.) Sometimes, you will find that your rule, in fact, did execute as expected, but a device may not have responded as intended. This will help you begin troubleshooting. The "Display current values" may also be helpful to have enabled if you have conditional actions or may otherwise care about the value of conditions/expressions, variables, and other states during execution. See How to Troubleshoot Apps or Devices for more troubleshooting tips.
Additionally, ensure your rule was created correctly. For example, without trigger events, rule actions will never execute unless run from another rule or app (or run manually from the rule page itself). This documentation or the Hubitat Community can help if you get stuck.
Why can't I use "AND" in the list of trigger events?
Triggers represent events, which are an instant in time — for example, motion becoming active, a switch turning on, or the time becoming 8:30 PM. An event cannot be true or false; it just something that happens. A rule will trigger any time an event matching any trigger event occurs (unless restricted by required expressions or conditional triggers). The "OR" between multiple trigger events in the trigger event list appears there automatically to help you remember this.
If you want to check a state rather than respond to a specific event, you need to do one of the following:
- check state in the actions using conditional actions (e.g.,
IF (expression) THEN...END-IF) - use a required expression to restrict triggering when a certain expression is not true (if the expression is not true at the moment just before the trigger event happens, the rule will not trigger)
- use a conditional trigger instead of a "plain" trigger (the condition attached to the trigger is evaluated after the trigger event happens, and the trigger will be discarded if false).
Why is the value of the %device% variable not what I think it should be?
As mentioned above, %device% is set to the name of the last device that triggered the rule (or certain other values in specific cases). This means it will be blank until the rule is triggered, set to the last device that actually triggered the rule even if you changed your list of possible trigger events, and unaffected by the Run Rule Actions button (because this is not a trigger event). The same applies to %value%, %time%, and %text.
Need more help?
The Hubitat Community is a great place to ask questions and share ideas with fellow users.
Capabilities and Actions
Below is a complete list of trigger event capabilities (on the "Select Trigger Events" page) and available actions (on the "Actions to Run") page, which can be useful to consult if you are not sure where to find something or what capability to choose for a specific event.
List of Trigger Event and Condition Capabilities
The following is a list of capabilities found on the "Select Trigger Events" page and the attribute or event that the trigger can listen for. Most of these capabilities can also be used to create conditions for expressions. Some (denoted "conditions only") are only available for use in conditions and not triggers, while some (denoted "triggers only") are only available for use in triggers.
| Capability | Description (attribute, event, etc.) |
|---|---|
| Acceleration: | active / inactive |
| Battery: | value |
| Between two dates: | starting month/day or variable / ending on month/day or variable (conditions only) |
| Between two times: | starting at time of day or variable / ending at time of day or variable (conditions only) |
| Button: | pushed / held / doubleTapped / released (triggers only) |
| Carbon dioxide sensor: | value |
| Carbon monoxide sensor: | detected / clear / tested |
| Certain Time: | at a certain time, including sunrise / sunset with offset, with optional date (triggers only) |
| Cloud End Point: | run rule actions with HTTP GET or POST to generated cloud URL (triggers only) |
| Contact: | open / closed |
| Custom attribute: | device capability |
| Days of Week: | on certain days of the week (day[s] as condition or day[s]/time as trigger) |
| Digital switch: | on / off (triggers only); switch events with type of digital |
| Dimmer level: | value |
| Door: | open / closed |
| Energy meter: | value |
| Fan speed: | supported fan speed values |
| Garage door: | open, closed, opening, closing, unknown |
| Gas detector: | clear / detected / tested |
| HSM alert: | intrusion, intrusion-delay, intrusion-home, intrusion-home-delay, intrusion-night, cancelRuleAlerts, intrusion-night-delay, smoke, water, rule, arming, armingHome, armingNight, cancel (triggers only) |
| HSM status: | armed away, armed home, armed night, delayed arming home, delayed arming night, delayed arming away, disarmed, all disarmed |
| Humidity: | value |
| Illuminance: | value |
| Keypad codes: | code name |
| Last Event Device | select device and attribute (triggers only) |
| Local End Point: | run rule actions with HTTP GET or POST to generated local URL (triggers only) |
| Location event: | mode / sunrise / sunset / sunriseTime / sunsetTime / systemStart / severeLoad / zigbeeOff / zigbeeOn / zwaveCrashed |
| Lock: | locked / unlocked |
| Lock codes: | code names |
| Mode: | any of your hub's modes |
| Motion: | active / inactive |
| Music player: | playing / paused / stopped |
| On a day: | specific date or variable |
| Music player: | playing, paused, stopped |
| Periodic schedule: | allows periodic schedules for minutes, hourly, daily, weekly, monthly or yearly (triggers only) |
| Physical dimmer level: | value (triggers only); level events with type of physical |
| Physical switch: | on / off (triggers only); switch events with type of physical |
| Power meter: | value |
| Power source: | mains / battery |
| Presence: | present / not present or arrives / leaves |
| Private Boolean: | true / false |
| Rule paused: | rule |
| Security keypads: | armed away / armed home / armed night / disarmed / changed (triggers only) |
| Shock sensor: | clear / detected |
| Smoke detector: | clear, detected, tested |
| Sound: | detected / not detected |
| Switch: | on / off |
| Tamper alert: | detected / clear |
| Temperature: | value |
| Thermostat cool setpoint: | value |
| Thermostat fan mode: | value |
| Thermostat heat setpoint: | value |
| Thermostat mode: | heat / cool / auto / off / emergency heat |
| Thermostat state: | heating / cooling / fan only / idle / pending heat / pending cool |
| Time since event: | attribute (or any), plus minimum time since event |
| Time of day: | specific time / sunrise / sunset |
| Variable: | value |
| Valve: | open / closed |
| Water sensor: | dry / wet |
| Window shade: | closed / open / opening / closing / partially open / unknown |
List of Actions
The following is a list of the actions available on the "Select Actions to Run" page. This can be helpful to consult if you are unsure where to find a specific action in the menus.
| Select Action Type to Add | Select Which Action |
|---|---|
| Conditional Actions | IF (expression) THEN
ELSE-IF (expression) THEN ELSE END-IF Simple Conditional Action |
| Control Switches, Push Buttons | Turn switches on/off
Toggle switches Flash switches Set switches per mode Choose switches per mode Push button Push button per mode Choose button per mode |
| Set Dimmers and Bulbs | Set dimmer
Toggle dimmer Adjust dimmer Set dimmer per mode Fade dimmer over time Stop dimmer fade Start raising/lowering dimmer Stop changing dimmer Set color Toggle color Set color per mode Set color temperature Toggle color temperature Set color temperature per mode Change color temperature over time Stop changing color temperature |
| Adjust Shades/Blinds or Fans | Open/Close shades/blinds
Set shade/blind position Stop shade/blind Set fan speed Cycle fans Activate Scenes Activate Scenes per Mode |
| Control HSM, Garage Doors, Locks, or Valves | Arm/Disarm Hubitat® Safety Monitor
Open/Close garage door Lock/Unlock locks Open/Close valves |
| Control Thermostats or Thermostat Scheduler | Set thermostats
Set Thermostat Scheduler Set Thermostat Controller sensors |
| Send, Speak, or Log a Message, Send HTTP Request | Send/Speak a Message
Log a Message Send HTTP Get Send HTTP Post Ping IP address |
| Control Music Player, Volume, Sounds | Control Music Player
Set Volume Mute/Unmute Sound Tone Sound Chime Control Siren |
| Set Variable, Mode or File, Run Custom Action | Set Variable
Set Mode Run Custom Action Write to local file Append to local file Delete local file |
| Set Private Boolean, Run/Cancel/Pause Rules | Set Private Booleans
Run Rule Actions Cancel Rule Timers Pause/Resume Rules Activate Room Lights for Mode/Period Turn Off Room Lights |
| Capture/Restore, Device Refresh or Polling | Capture Devices
Restore Devices Refresh devices Poll devices Disable/Enable devices Start/Stop Z-Wave Polling |
| Repeat actions | Repeat Actions
Repeat While Expression END-REP Repeat Until Expression Stop Repeating Actions |
| Delay, Wait, Exit or Comment | Delay Actions
Delay Actions Per Mode Cancel Delayed Actions Wait for Events Wait for Expression Exit Rule Comment |