Device Detail
Learn how to use the device detail page — the page for each individual device you'll find linked to from the "Devices" page.
Device Detail Page
The Device Detail page is accessed by navigating to Devices (in the sidebar of the hub UI) and then selecting a particular device from the list. Selecting the device in the list will pop a "flyout" over the Devices page by default, allowing you to view and interact with the device without leaving the Devices page. Alternatively, selecting the outward-arrows icon will open the device detail page in a new window or tab, which may be helpful for viewing or testing multiple devices at the same time. Both contain the same information.
The device detail page or flyout allows you to view the current device state; manually send commands to the device; edit device information; and view or edit the device name, preferences, and other details about the device. This page may look slightly different for different devices, depending on the device and driver.
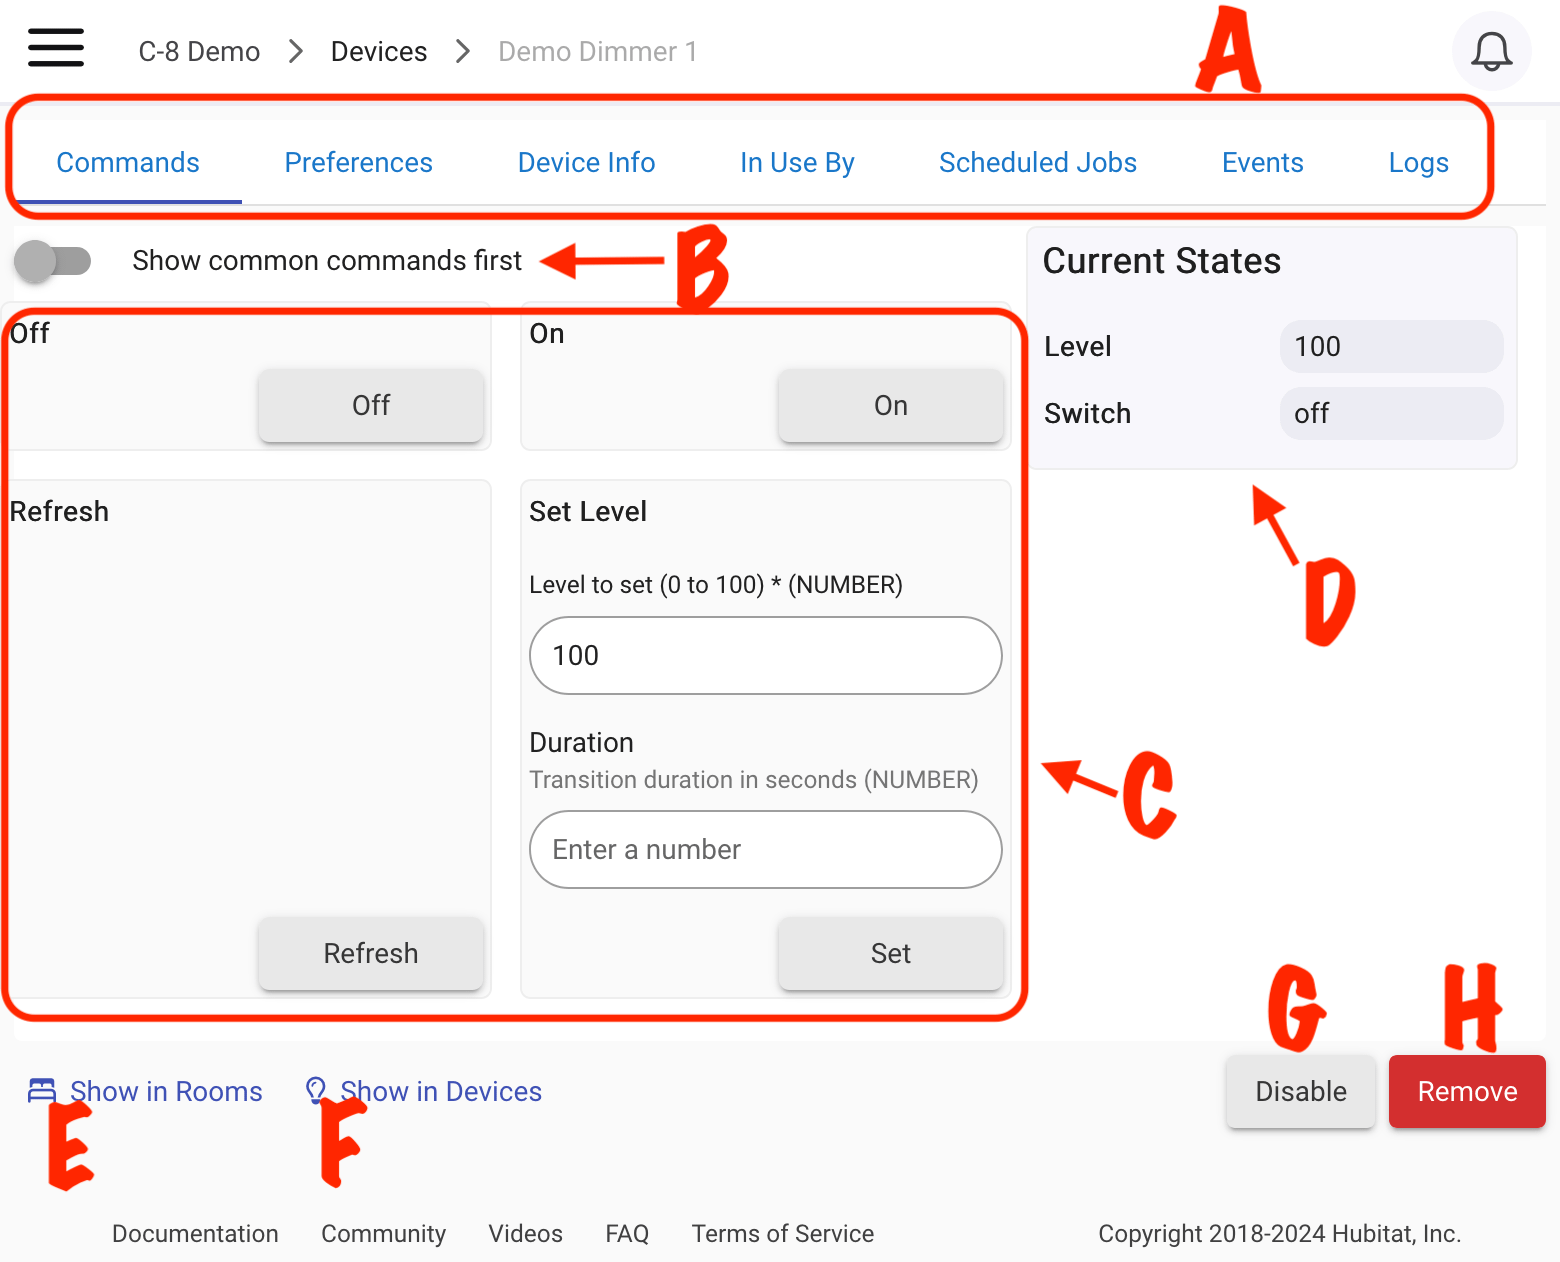
The page is divided into various tabs (A) with different contents:
-
The Commands tab allows you to view commands that the device supports, send these commands, and view the current states of the device. Information on this tab includes:
- The commands section (C) contains buttons that allow you to manually send a command to the device (e.g., to try to turn the device on or off or change some other state). Some commands may require parameters, values that provide necessary information (e.g., the level to which to set the device when running the "Set Level" command). The Show common commands first toggle (B) shows commands you are likely to use more often (e.g., on/off for a switch) towards the top of the list and also combines certain commands into the same tile (e.g., an on/off slider for the separate on and off commands, with the display of the toggle based on the current value of the "switch" attribute as reported by the device/driver). While many commands are device-specific, here are examples of frequently-found commands:
- On and Off: turns the device on or off (usually found on switches, dimmers, bulbs, etc.)
- Configure: Pressing this button causes the driver to execute its
configure()function. This function usually sends configuration commands to the Zigbee or Z-Wave device, instructing those devices on how to report status updates back to the Hubitat hub or setting preferences chosen in the UI. This normally happens automatically whenever a device is initially added to the hub, but it is also generally a good idea to run if you manually change drivers. - Refresh: polls the device to retrieve new current states (see below). Note that battery-powered devices, especially Z-Wave ones, may need to be “woken up” before they will report back.
- Current States (D) shows the current status of the device and can be as simple as one state showing "on" or "off", but it may also include other status readings such as battery level and temperature, etc. Technically, these states are composed of an attribute (or event name) and value. For example, in the screenshot above, the
switchattribute has a value ofoff. Changes in these states are the primary way by which device-based automations on the hub can be created (e.g., when X happens, do Y). - State Variables (may not appear if device has none) are generally intended only for internal use by the driver and are not of concern for regular use of the device (they can be helpful to consult if you are developing a driver or working with a developer to troubleshoot). Different drivers/devices may put different information here or, as in the example above, none at all.
- Device Data (may not appear if device has none) may include information such as manufacturer or product names, firmware version, or other device data that will rarely change. This data, if any, may vary by protocol (Zigbee, Z-Wave, etc.) and driver.
- The commands section (C) contains buttons that allow you to manually send a command to the device (e.g., to try to turn the device on or off or change some other state). Some commands may require parameters, values that provide necessary information (e.g., the level to which to set the device when running the "Set Level" command). The Show common commands first toggle (B) shows commands you are likely to use more often (e.g., on/off for a switch) towards the top of the list and also combines certain commands into the same tile (e.g., an on/off slider for the separate on and off commands, with the display of the toggle based on the current value of the "switch" attribute as reported by the device/driver). While many commands are device-specific, here are examples of frequently-found commands:
-
The Preferences tab is where you can configure device or driver behavior. Most drivers offer options to enable or disable debug logging (which may be helpful for troubleshooting device behavior or working with the driver developer) or event description text logging (which can be helpful to see event history in Logs if that is helpful for device or app troubleshooting). Devices may also have some settings that you can configure here. The exact options here will vary by driver and device. Consult the device user manual or, if applicable, the custom driver developer for details on what any particular option may do. Select Save (below the preferences) to save any changes made on this tab.
- The Default current state preference (formerly referred to as Status attribute for Devices/Rooms) is provided by the hub for all devices. This chooses which attribute from "Current States" has its value displayed in the Status column on the Devices and Rooms pages. For example, if you select "switch," you will see "on" or "off" in the Status column for this device. (You can also edit this setting from the Rooms or Devices pages themselves using the pencil icon in this column, enabled from the display settings on the page if not visible.)
-
The Device Info tab is where you can change the device name or label and view or change other settings related to the device on your hub. Options include:
- Device Name: Often set by the hub automatically when adding the device; will be used as the dispaly name if no Device Label is provided.
- Device Label: Will be used as the display name for the device (in the Devices list, Logs, device selectors in apps, etc.) if specified.
Device Name vs. Device Label: The “Device Name” is used as the display name if no “Device Label” is specified; otherwise, the “Device Label” is used. The display name affects how devices appear in device lists inside apps, in logs, and other places throughout the interface — as well as the default name when used with apps that provide integrations to other services, like Alexa, Google Home, or HomeKit. Most devices let you edit either or both to your liking. In some case, the "Device Name" may be set by a parent driver/app or integration. In general, we recommend using "Device Label" as the name you want to see and use for a given device.
- Device Network Id: Automatically assigned by the hub or parent app or driver; generally not intended to be changed (this is not the same as the numeric hub-assigned device ID as may be needed for apps such as Maker API). For Z-Wave devices, this corresponds to the node ID. For Zigbee devices, this is the "short" (16-bit) Zigbee ID. For Matter devices, the numbers at the end of this ID represent the Matter node ID.
- The Event history size, State history size, and Too many alerts threshold allow you to configure non-default options related to how the hub stores device history for this device and if/when hub alerts are generated for "excess" events (greater than the threshold) sent by this device
- Type: shows the current driver and allows you to change the driver to another one if needed (e.g., if the proper driver was not automatically selected when adding the device).
- Room: Allows easy assignment of this device to a Room (can also be done from the Rooms page)
- Dashboards: Allows easy authorization of this device for the selected Hubitat Dashboard or Easy Dashboard apps (the same as can be done from Apps, then navigating to the parent Dashboard app and then the particular Dashboard child app for which you wish to authorize the device)
- Hub Mesh enabled: Allows you to add your device to Hub Mesh (can also be done via Settings > Hub Mesh; note that this option refers to the the Hub Mesh feature that allows sharing device events and commands to other Hubitat hubs on your network, not to any features of underlying protocols, including Zigbee or Z-Wave)
- HomeKit enabled: Adds the selected device to the HomeKit integration (can also be done via Apps > HomeKit Integration, which also provides additional options for what device features are exposed to HomeKit)
- Tags: Allows adding or removing tags and assigning them to this device. The primary purpose of tags at this time is to add additional text that can be searched on to find this device, e.g., to filter the Rooms or Devices lists when using the search feature to filter the list
- Device Details shows metadata about the device, including when it was created on Hubitat and device-specific data the platform or driver adds to this section.
- Select Save (previously Save Device) to save any changes made on this tab
-
The In Use By tab shows what apps are using this device. This can be helpful when troubleshooting device behavior (e.g., figuring out which apps/automations you have set up that may have sent a command to the device) or when removing a device from your hub (because you should de-select the device in all such apps first to avoid creating a problem caused by unexpected removal).
-
The Scheduled Jobs tab shows any jobs the driver has scheduled for itself. Note that this does not reflect anything that an app (automation) may have scheduled for that device; that information would be found in App Status, generally as configured in the app's regular interface. (This information is often only useful when troubleshooting a driver with the developer or driver code you are writing as a developer yourself.)
-
The Events tab shows a recent history of events (as would have been seen as changes under "Current States") and commands sent to the device (even if no state change resulted). Both can be helpful for troubleshooting. See device events for more details.
-
The Logs tab displays a list of Past Logs page filtered to entries for this device. Go to the hub Logs page for more information.
-
The Disable (or Enable) button (G) disables the device, which prevents any driver code from running for this particular device. This can be useful for troubleshooting hub problems or as an unusual (but possible) way to stop automations related to this device. Note that this feature relates to use of the device on the hub only and has no effect on the underlying protocol (e.g., it will not prevent a Z-Wave device from participating in your Z-Wave mesh network). The Enable button restores the device to regular behavior on the hub if disabled.
-
The Remove button (H) allows you to remove the device from Hubitat. Be sure to remove the device from any apps using the device before removing it; apps using the device will be shown under the In Use By tab. If this device is a Z-Wave device, be sure to put the device in exclusion mode (check the manufacturer's instructions) when using this option. Most Zigbee devices do not require this, though you may still reset the device manually if necessary; nor do most Matter, LAN, and other devices. However, the manual for your device should have specific exclusion or removal instructions if needed.