How to Collect Information for Support
How to Collect Information for Support
To assist with providing you with support, it may be necessary to gather and submit information to the Hubitat support team. Please help us assist you by copying logs and capturing screenshots of device/driver, app, settings, or log pages that are related to or are suspected to be related to the issue.
The Community forum is also a helpful resource. Our staff are active in the forum, and your question or problem is quite likely to be answered or solved there.
Logs
For detailed information about the Hubitat Logs page, please refer to the Logs documentation.
Anatomy of Hubitat Logs
Many issues with devices and app code can be identified by using Logs in the Hubitat interface. Examining your logs can save you a lot of time and frustration by quickly pinpointing the line of code in the device or app that is generating an error or revaling some other problem with the device or app.
Open your logs by selecting Logs on the left side of the Hubitat web interface. If you have devices connected and active or apps configured, you should start seeing log details appear as those devices generate activity or the apps execute, depending on your log settings. (See the app or device page to enable additional logging if needed.)
Each log entry will be labeled with one of five codes 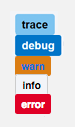 {.align-right}
The trace, debug, info, and warn codes generally display routine messages from properly functioning devices or apps. Logs coded error are generally of concern and should be given special attention.
If you notice error in your logs, it will be followed by additional information to help diagnose the issue. Pay close attention to error entries that show “no signature of method" or "exception."
The affected device or app will be listed on the left side. 
Error logs will normally also show which line of code is generating the specific error. If the error is in a custom driver or app, the log entry can give you clues to assist in debugging the code yourself, or contact the app/driver developer with this information. You may also use the search box to find specific log codes, dates, times, or text in the logs.
Capturing Log Files
To capture log files you can highlight, take a screenshot and post in the the Community forums or attach as requested to any communication with the support team. Please do not take photos of screens with the camera of another device; this often does not provide a high enough resolution image to see all the detailed information captured in the logs. Screenshots are preferred over copy/paste (which often contains extra text and less formatting that makes them hard to read).
By default, the Logs page opens to "Current Logs." These are only captured in the window when it is open; therefore, you may wish to keep the Logs page open in a dedicated window or tab as you troubleshoot a problematic app or device. You may also obtain log data from the "Past Logs" tab on the logs page; however, these are stored in a limited buffer that will purge the oldest logs when full, so you may no longer have the information you need here if the problem was not recent enough.
Isolating Log Entries
When you open Logs, it will default to showing all log entries, which is a combined view of the logs from all Hubitat apps and drivers. While this is convenient to quickly view if errors or warnings are appearing in the logs, it may not show enough information to help the support team troubleshoot the issue you are experiencing. Here's how to isolate the logs from a specific driver or app.
Device Logs
- Ensure Enable debug logging is switched on in the driver settings and choose Save Preferences. If the devices were added via an app rather than included/paired directly as Z-Wave or Zigbee devices, you may also need to enable debug logging options in that app.
- Open Logs in a dedicated browser tab or window.
- Leaving the logs open, return to the driver tab or window.
- For driver debug logging, tap the On, Off, Lock, Unlock or other command (button) on the device page to make it generate log entries. Typically, support will instruct you what to operate in a driver details page to generate required logs. This may include tasks such as manually operating a device or triggering a sensor. When specific information is required, you'll receive instruction from support.
- Return to the logs page you left open in the separate tab or window, then tap or click on the specific device name (in the list at the top). This will filter by just this device.
- If desired, use the Clear button to hide currently-displayed entries before trying to generate additional logs, as in step 4.
App Logs
- Open the app used to create the automation, and look for logging options. These may be labeled "Enable logging," "Enable debug logging," "Logging?," or similar.
- Open Logs in a dedicated browser tab or window.
- Leaving the logs open, return to the app tab or window.
- Wait for the app to execute, or manually "trigger" the app yourself if possible. Typically, support will instruct you what to do to generate helpful logs. This may include tasks such as manually operating a device or triggering a sensor.
- Return to the logs page you left open in the separate tab or window, then tap or click on the specific app name (in the list at the top) to filter by just this app. You may also used the advanced filters at the top of the page to filter by multiple apps, drivers, or other criteria.
- If desired, use the Clear button to hide currently-displayed entries before trying to generate additional logs, as in step 4.
Capturing Screenshots
Multi-Platform
Full screen capture is easily obtained by using a plugin for your browser. This quickly captures all the information on screen that would normally requires scrolling and multiple screenshots in order to provide support with everything needed. One of the simplest to use is named Full Page Screen Capture for Google Chrome.
Windows
- If you use Windows 10 or 11, press the Windows key + Shift + S , which will dim the screen, display a crosshairs, and allow you to select an area of the screen to capture.
- On any version of Windows, press the PrtScn (Print Screen) key to capture the entire screen, or press Alt + PrtScn to capture the current window. Note: If you have a laptop keyboard, it may be necessary to also hold down the Fn key in order to capture a screenshot (to actually press PrtScn).
- After using either method above, the image will be stored in the clipboard. Paste the image (Ctrl + V) into Paint, another image editor, Wordpad, or a similar app. Save the file for upload to Hubitat support.
- Alternatively, search the Start menu for "Snipping Tool" or "Snip and Sketch" to take and save a screenshot. See this Microsoft support document for more information on the Snipping Tool: https://support.microsoft.com/en-us/windows/use-snipping-tool-to-capture-screenshots-00246869-1843-655f-f220-97299b865f6b
- To take screenshots on a Surface tablet or any other Windows tablet without a keyboard, you can take full-screen screenshots by pressing the Windows logo and the Volume Down key at the same time. You will see the screen getting darker when you do this, indicating that a screenshot was made. You will find the screenshot in your Pictures library for upload to Hubitat support.
Microsoft Surface Pro
If you have a Surface Pro tablet from Microsoft with Windows 10, you need to use different keyboard shortcuts because there is no PrtScn key on the Type Cover (unless you are using a different keyboard). Instead, Microsoft offers the following Surface-device specific shortcuts for Windows 10:
- Fn + Spacebar - this shortcut stores an image of your current screen in the clipboard. Paste the image (Ctrl + V) into Paint, an image editor or Wordpad. Save the file for upload to Hubitat support.
- Fn + Alt + Spacebar - this shortcut stores a screenshot of the active window in the clipboard. Paste the image (Ctrl + V) into Paint, an image editor or Wordpad. Save the file for upload to Hubitat support.
Apple macOS
- To capture full screen on Macintosh, hold down the Command, Option and Shift keys together and press 3 (⌘ + ⌥ + ⇧ + 3). The resulting PNG file name will be Screenshot with the date and time, and it will be saved to your desktop for upload to Hubitat support.
- To capture a specific area on Macintosh, hold down Command, Option and Shift keys together and press 4 (⌘ + ⌥ + ⇧ + 4). The cursor will change to a crosshair. Click, hold and drag across the area you wish to capture, releasing to complete the capture. The resulting PNG file name will be Screenshot with the date and time, and it will be saved to your desktop for upload to Hubitat support.
Android Phones and Tablets
- To capture screen shots on Andriod devices, press the volume down button and the power button simultaneously. Resulting screen shots will be saved in the Gallery app under Screenshots for upload to Hubitat support.
Amazon Fire Tablets
- To capture screenshots on Amazon Fire tablets, press the volume down button and the power button simultaneously. Resulting screenshots will be saved in the Amazon Photos app for upload to Hubitat support.
Apple iOS Devices
To capture screenshots on iOS or iPadOS devices, there are two different methods, depending on whether or not your device has a Home button.
-
For iOS devices with a home button, simultaneously press the home and power buttons. The resulting screenshot will be saved to the Photos app for upload to Hubitat Support.
-
iOS devices that do not have a home button require you hold the Side button on the right of your device and then immediately press the volume up button on the left side. The resulting screenshot will be saved to the Photos app for upload to Hubitat support.
Screenshot Examples
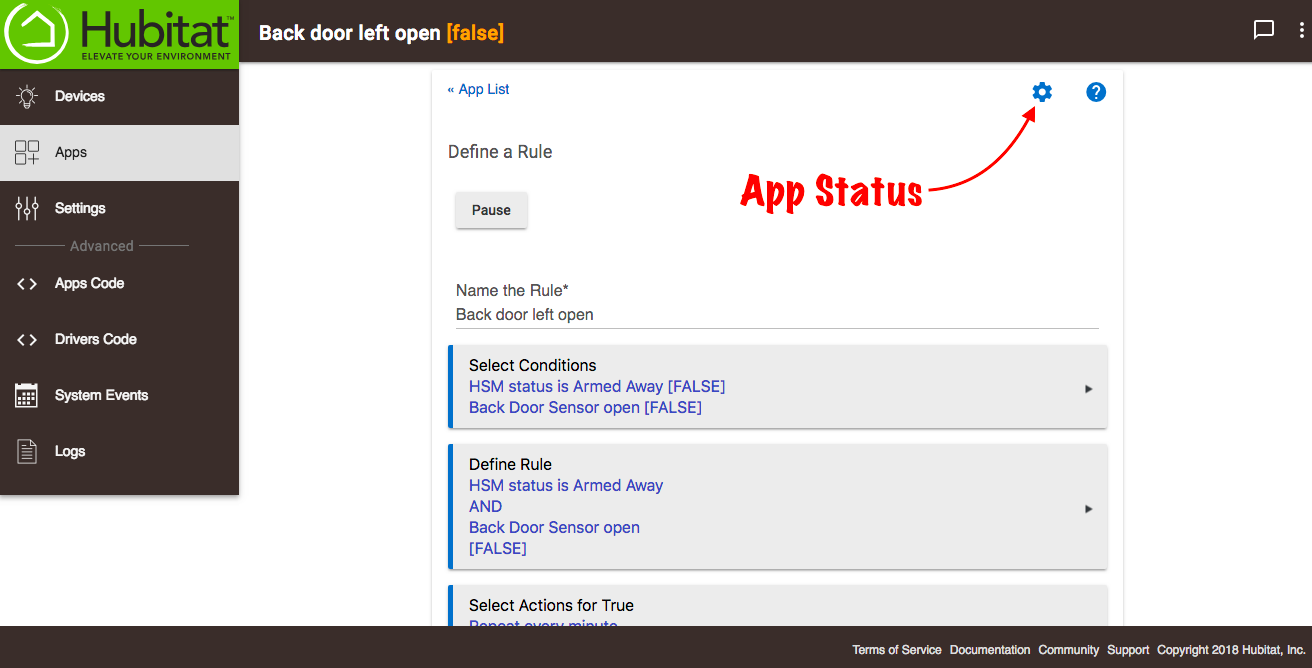
To get to the App Status page, select the gear icon at the top right of your Rule Machine® rule, or other app.
Submitting Support Requests
In order to best assist you with the issue you are experiencing, please first try substituting any custom drivers with virtual or built-in drivers to see if the behavior can be reproduced.
Using built-in apps (Basic Rule, Rule Machine, Motion Lighting, etc.) and temporarily removing or disabling custom apps will help to establish a baseline for testing. Once the custom drivers and apps have been substituted for built-in drivers and apps, test your system to see if the issue persists. If your hub is still not performing as expected, escalate the problem to our support team.
Please include the following in support requests
- Your hub platform version and hub hardware version (from Settings > Hub Details).
- A detailed description of the problem: what is happening and the expected result.
- Driver debug logs and application log, isolated to the specific device or application that is suspected (see above).
- Screenshots of associated Rule Machine® rule details, or other app configuration; plus Device Detail and App Status.
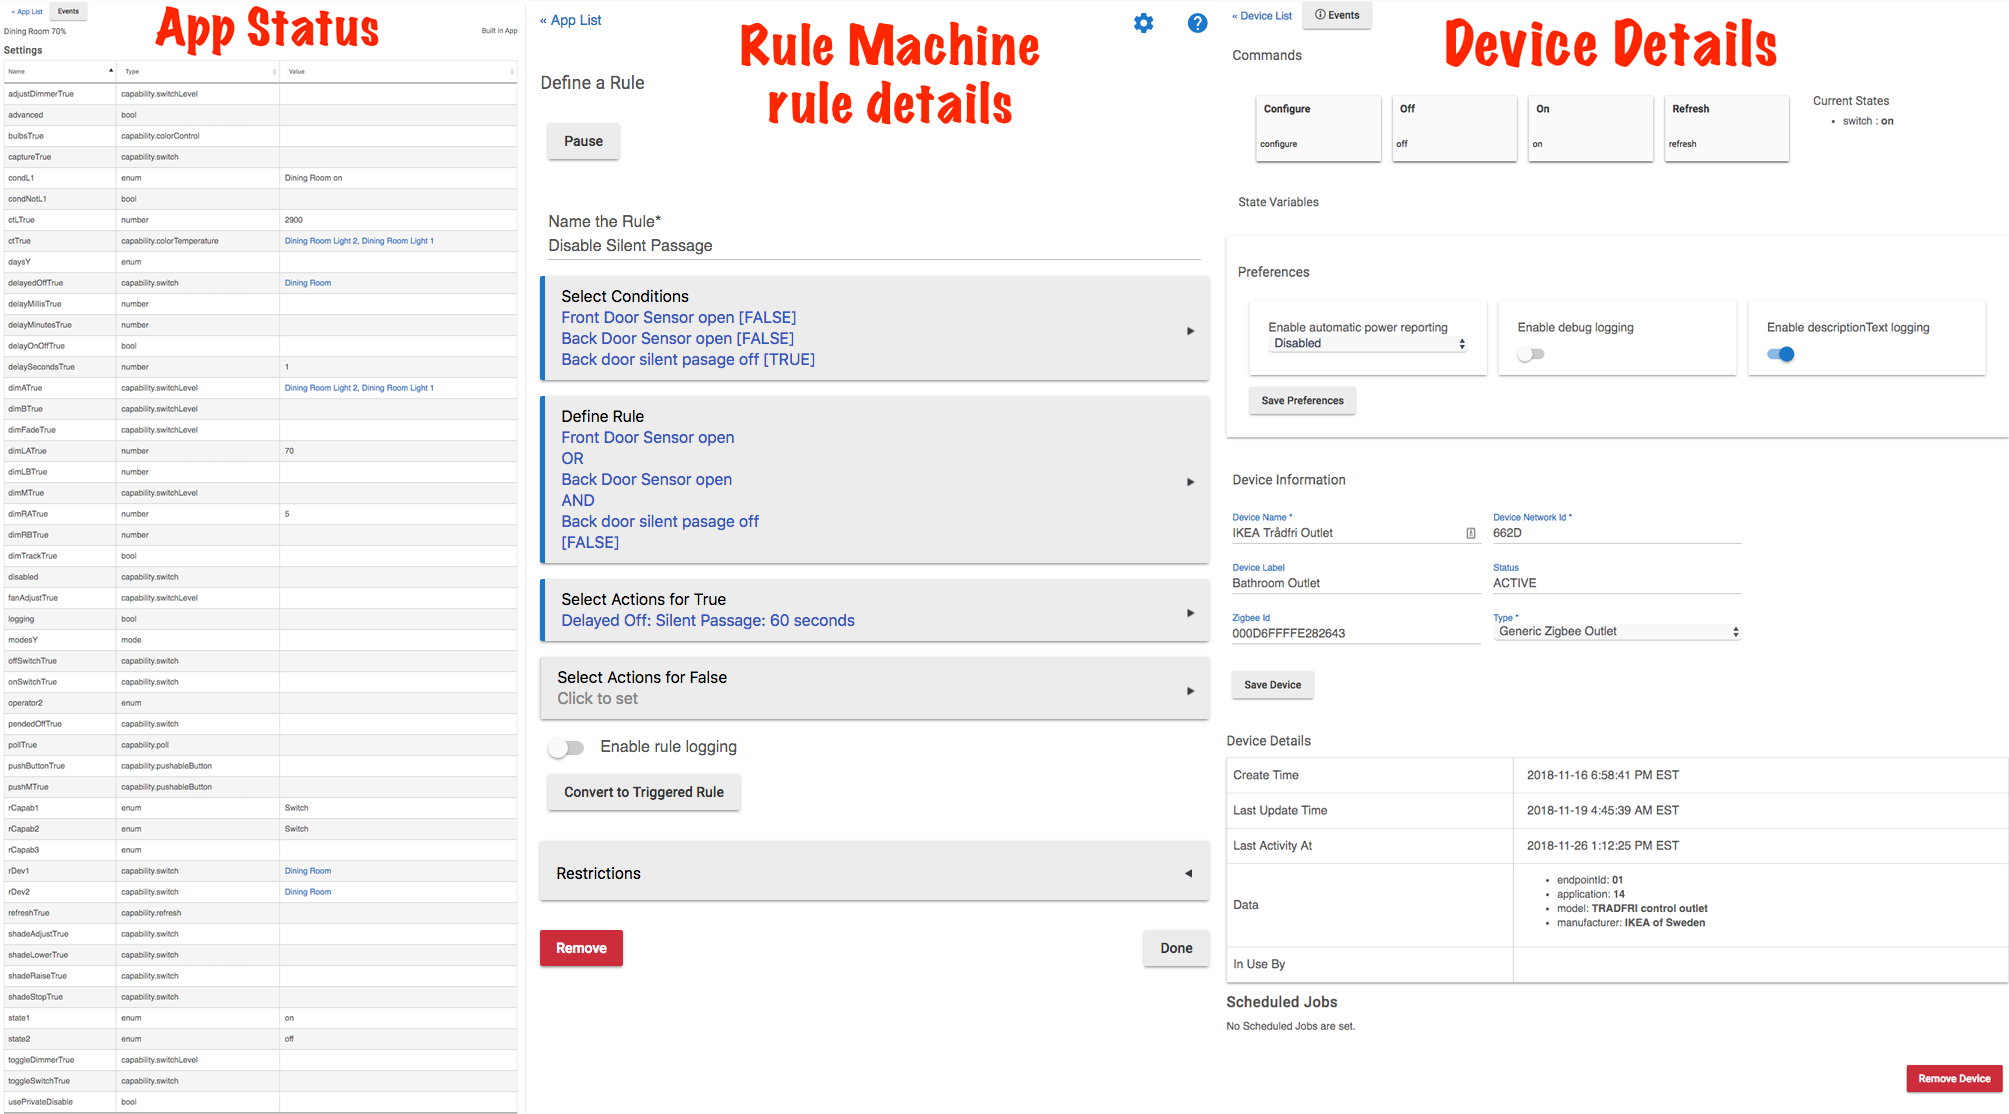
NOTE: For Rule Machine®-specific support requests, please also include a brief but comprehensive description of what you want to accomplish with your rule.
If removing the custom driver or app solves the issue, the problem is with the custom code. We do not support custom code but encourage you find the source of the problem and reach out to the developer directly (if it is not your own code). To find the code that is responsible for the issues you have been experiencing, add your custom drivers and apps back into your system one at a time, testing your system each time you add a custom driver or app. Once you pinpoint the driver or app code that is causing the issue, please contact the developer in order to resolve it. You can also post in the community to help others who may be experiencing similar issues.