Network Setup
Configure networking settings on the hub
Network Setup (Settings)
The Network Setup settings page, accessible from Settings, allows you to:
- override default DNS settings if needed
- switch between DHCP (default) or a static IP address
- configure Ethernet speed for LAN connection if auto-negotiation does not work (typically only necessary in rare cases with specific network switches)
- configure auto-reconnect interval for DHCP connection if necessary
- configure the hub to connect via Wi-Fi instead of Ethernet (supported models only)
This page is available on hub models C-5 and later only. Earlier models use DHCP and do not offer further customization.
Override DNS Settings
To override the hub's default DNS settings, expand the Override DNS Settings section and enter one or more DNS server IP addresses under DNS name servers override, comma separated. To use multiple DNS servers, separate the IP addresses with a comma.
For example: 8.8.8.8, 8.8.4.4, 1.1.1.1, 1.0.0.1, 9.9.9.9
Static IP/DHCP configuration
Static IP address
To configure a static IP address, expand the Switch to static IP section, then:
- Enter the desired static IP address for your hub, the default gateway, and DNS servers. (The subnet mask cannot be changed for static IPs via the user interface, but the default is applicable for most home networks. Advanced users can change this setting as described in Advanced Network Options. )
NOTE: We suggest using a DHCP reservation on your router instead of this option, as it does not require any special configuration on the hub, leaves little room for error, and gives a similar result. Having a non-changing IP address — however it is done — can be helpful, though neither is required.
If assigning a static IP, ensure it is outside the DHCP range for your router and that you know what other settings are appropriate for your network. Incorrect settings can cause your hub to be unable to connect to the Internet or an inability for you to connect to your hub on your own network. A network reset may help you re-gain access if needed (see below).
-
Select Save and switch to static IP.
-
You must reboot the hub for the changes to take effect.
NOTE: Static IP/DHCP configuration applies to the built-in Ethernet port only. Wi-Fi will always use DHCP.
Network Reset
If you are accidentally blocked from accessing your hub (e.g., due to a misconfigured static IP address) or want to revert hub network settings to default for any reason:
-
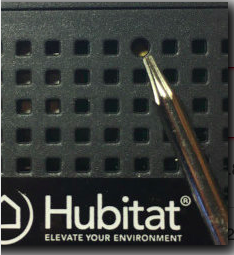
Turn the hub over and locate the recessed round button just beneath the surface of the case (pictured below).
-
Use the point of a pen (or other small, blunt object) to press and hold this button for at least 7 seconds.
-
Release the button, and the LED on the front of the hub will blink. (If the LED does not blink, return to the previous step and try again, paying attention to the timing.) After a few more seconds, the LED will turn solid blue as the hub reboots. Finally, after a few minutes, the LED should return to green, at which point the hub has finished rebooting and should again be accessible.
DHCP address
To change back to DHCP (and let the router assign an IP address to your hub via its MAC address), expand the Switch to DHCP section, select the Switch to DHCP now button, and reboot the hub the hub from Settings.
Wi-Fi setup
Hubitat model C-8 includes built-in Wi-Fi. Models C-5 and C-7 can also connect via Wi-Fi by adding a compatible adapter.
- Expand the Wi-Fi Settings section, then select the network name (SSID) and enter the password for the Wi-Fi network you want the hub to join.
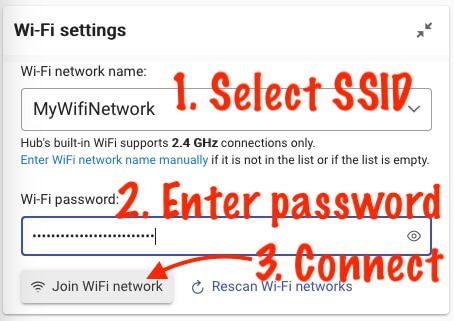
- Select Join Wi-FI Network to connect.
- When you see the message Successfully joined Your Wi-Fi SSID Name, select the shut Ethernet down link and unplug the Ethernet cable.
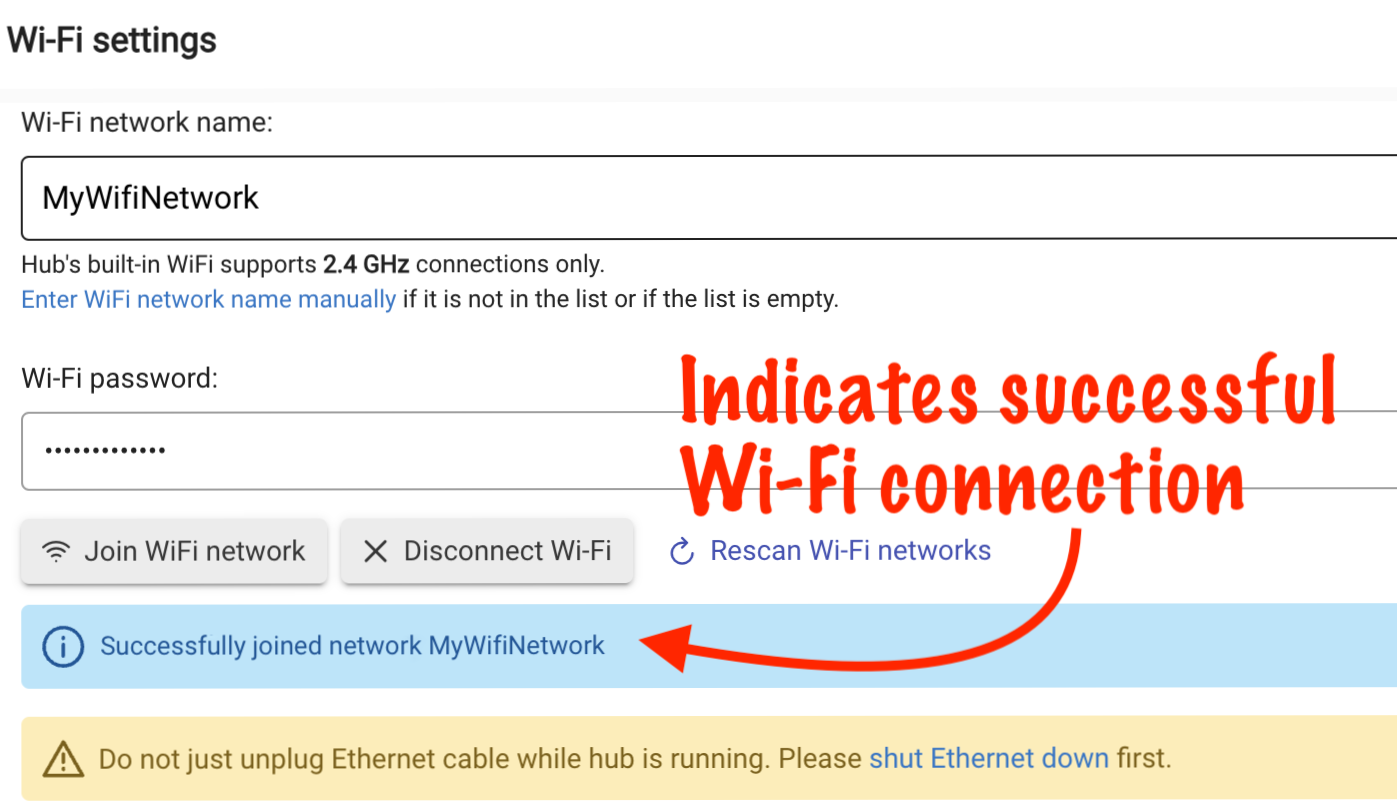
NOTE: If you are accessing the hub using its IP address, you will need to use its new (Wi-Fi) IP address after completing the above steps. Use http://findmyhub.hubitat.com to discover your hub on your network if you are unsure.
-
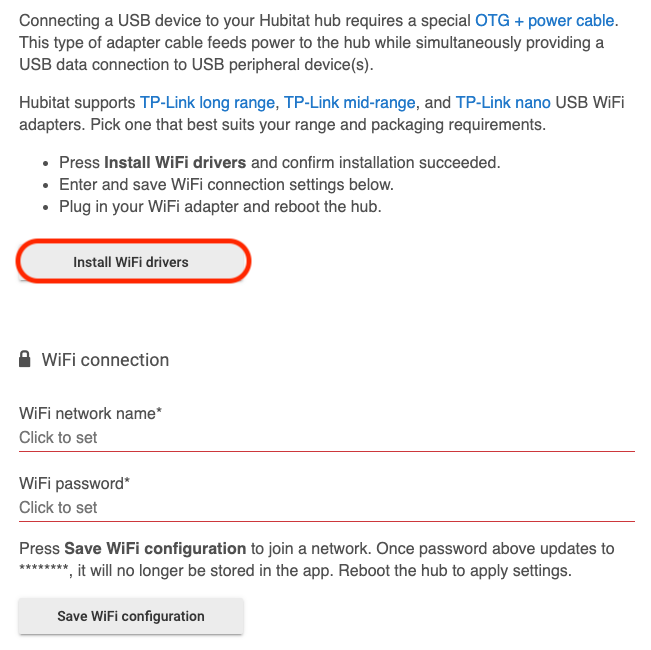
Expand the Wi-Fi Drivers section, then select the Install Wi-Fi drivers button. Ensure the installation succeeded (you will see a note on the page) before continuing.
-
Shut down the hub.
-
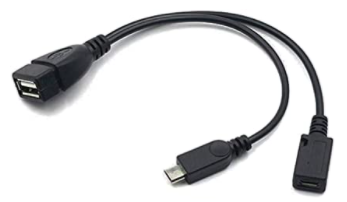
Connect a USB OTG + power cable (not included) to your hub. This type of adapter cable feeds power to the hub while simultaneously providing a USB data connection for USB devices. An example:
-
Plug a compatible Wi-Fi adapter into the USB port on the OTG adapter cable. A list of known compatible adapters is provided on the Network Settings page. The TP-Link Archer T2U Plus is likely to have the best range among the supported options and is recommended if the size of the adapter is not a concern.
-
Plug in the micro-USB power cable to the port on the OTG cable. The hub will begin booting.
Changing connection from Wi-Fi to Ethernet
If you have configured Wi-Fi and want to restore hub connection via Ethernet:
- Plug in an Ethernet cable, connecting the hub to your router or network switch.
- Select Disconnect Wi-Fi under Wi-Fi Settings. (Do not use both Wi-Fi and Ethernet connections simultaneously. Connecting an Ethernet cable will not automatically disconnect Wi-Fi.)
- First follow the instructions for model C-8. Afterwards, perform the following additional steps.
- Shut down the hub from Settings.
- Disconnect your USB Wi-Fi adapter (and the special OTG + power cable if desired).
- Unplug your hub from its power source for a at least 30 seconds, then plug it back in. (Unplugging from the wall side is recommended to avoid stressing the micro-USB connector.)
Advanced Network Options
Some advanced network settings are currently not available via the UI but can be changed via HTTP endpoints if needed.
Modifying these settings is not recommended for most users. Use caution, and only modify settings that you understand and know are necessary on your network.
- Change subnet mask (and set static IP, gateway, and DNS): https://community.hubitat.com/t/static-ip-address-and-dhcp-support-for-non-24-subnets/84194/13
- Change NTP server: https://community.hubitat.com/t/issues-in-2-2-4-latest/59284/7
Other Options
- Ethernet speed: Default setting is Auto negotiated (default) and recommended for most users. Selecting Fixed 100 Mbps is recommended only for users experiencing problems with the default setting (in particular, certain models of network switches have problems with auto-negotiation, with the most common symptom being slow loading of pages via the web interface).
- Auto reconnect: Default is Disabled. If enabled, the hub will ping router at the specified interval and attempt to reconnect if no response. Use if hub drops off LAN while using Ethernet. This setting works with DHCP wired connections only (not static IP or Wi-Fi configuration).
Network Test
Select the Network Test link at the top of the Network Setup page to open a page offering four utilities you can use to test your hub's network connectivity:
- Ping host: Assess reachability, latency, and other statistics for a remote host (i.e., pings this host)
- Ping gateway: Pings the gateway specified by your network configuration (whether static or DHCP)
- Traceroute: Displays the route packets take from your hub to the specified host, along with statistics for each
- Speed test: Downloads a small (~10 MB) file from the Internet and allows you to view progress and total time (see time listed with the "100%" line)
For example, if you are unable to use Settings > Check for Updates or uploading a cloud backup fails, you may have problems reaching the Hubitat servers due to incorrect network configuration. To test:
- Navigate to Settings > Network Setup and select the Network Test link
- In the Ping host text box, type
cloud.hubitat.com, select the Ping button, and wait a few seconds to verify the server is reachable. Example of acceptable output:
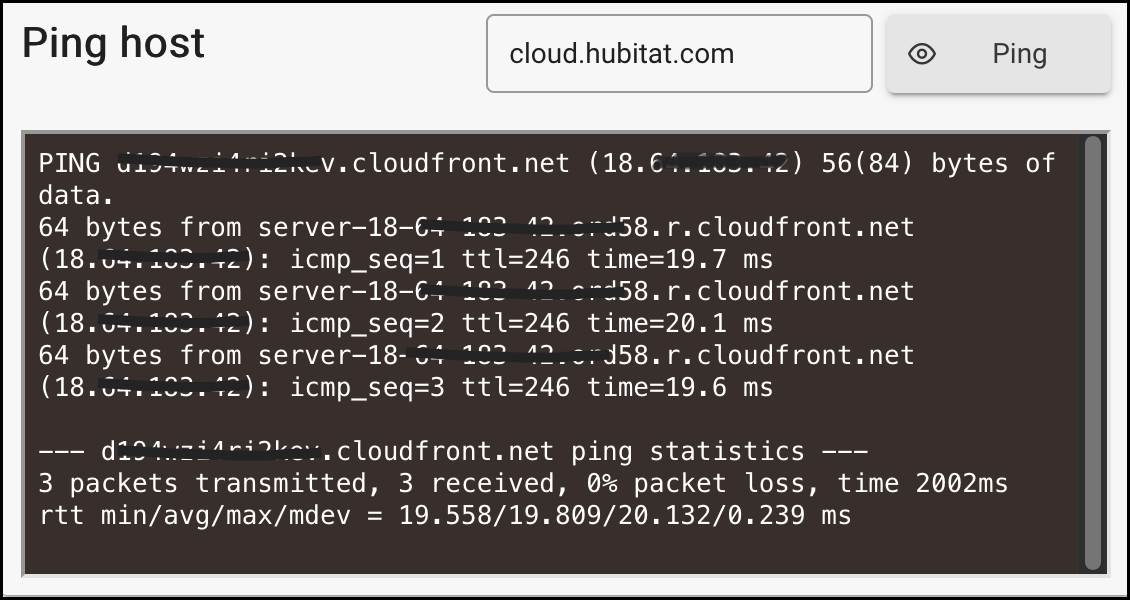
If ping fails, a common cause is misconfigured DNS servers. Two possible solutions are specifying valid DNS servers or reverting to DHCP rather than static configuration. A network reset is an easy way to revert all network settings to default and fix any misconfiguration. For any network troubles, also ensure your hub is connected to only Ethernet (recommended) or Wi-Fi; simultaneous connection to both is unsupported.