How to Troubleshoot Apps or Devices
If an app is not working as expected (for example, a rule fails to turn on a switch when you think it should) or you are experiencing problems with devices (e.g., commands not working), start here to troubleshoot.
How to Troubleshoot Apps or Devices
Is an app not working as expected? Or, is a device not working like you think it should? If so, start here for some troubleshooting tips!
App Troubleshooting
Is an app not working as expected? For example:
- Rule Machine, Basic Rule, or other app fails to turn on/off device when you think it should;
- Room Lighting does not turn on or off lights when you think it should; or
- Any problem you believe to be related to an app (automation) you have configured on your hub.
If so, here are some tips that may help.
Enable Logging
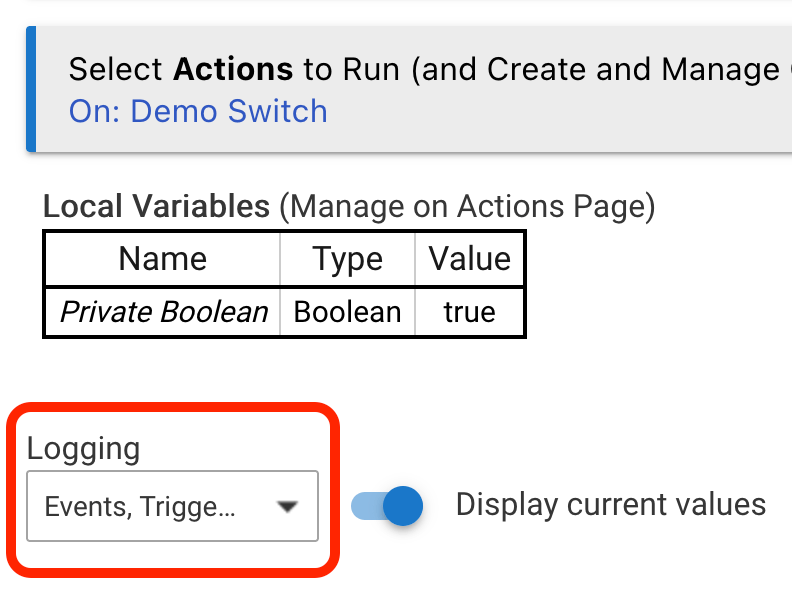
Most apps have one or more types of logging that can be enabled. For example, Rule Machine rules have a Logging option that allows you to enable one or more of Trigger, Action, and Event logging. Enabling Action logging in particular will tell you what actions the rule is executing when (though enabling all may be helpful). Enabling logs and then examining them to see what the app reports is a good first step to answer questions like "why didn't my rule run?" (perhaps it did and your devices simply didn't respond as expected, or it will reveal issues with your rule logic):
Most simpler apps have a toggle to enable all logging. For example, in Basic Rule:
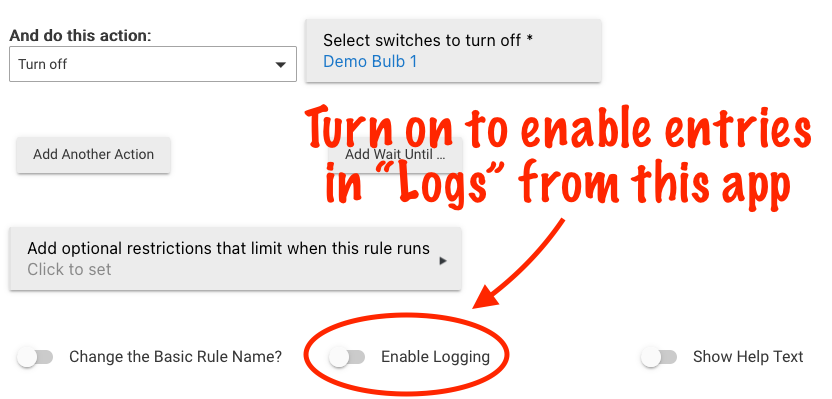
Other apps may have different options (and custom/community apps may vary), but most built-in apps offer one or more logging options similar to the above that may help.
Check Logs
Check the Logs page to view logs that apps may generate if logging is enabled as described above. You may also wish to scan the Past Logs (also accessible from the Logs page) for "error" or "warning" entries that may indicate a problem. Sometimes, error or warning logs are generated even without any kind of app (or device) logging specifically enabled, so it's always helpful to consult the logs even if you're troubleshooting a problem and did not have logging enabled when it happened.
HINT: Consult the Logs documentation to learn how to use features that may be helpful when troubleshooting specific apps or devices, like how to filter log entries to just specific apps or devices.
If you are unsure how to interpret logs, the official Hubitat Community forum is a great resource! Be sure to specify what app or device you are wondering about, your hub model, and the platform version – and anything else that may be helpful or relevant (e.g., screenshots of the logs).
Verify Configuration
Ensure the options you have selected in the app are the correct options to achieve your desired outcome. The Apps documentation section may be helpful. For Rule Machine rules or other complicated (or not!) apps, it may be helpful to ask the Community to look at your rule or other app configuration. For rules, it is generally helpful to post:
- A screenshot or description of your entire rule, including triggers and actions to run (and required expression, if used)
- A description of what you want the rule to do (in plain language, not thinking in terms of app-specific features or terminology)
- A screenshot of any relevant output from "Logs" (try enabling them as described above if you believe the actions are not running when or how you think they should)
Test Devices
If the app appears to be configured correctly and logging suggests it should be sending commands to devices correctly, perhaps there is a problem with the device. Try navigating to Devices, selecting the device in question, and manually running commands (buttons at the top of the device page) to see if they work as expected. For example, a switch device may present On and Off commands, and they would be a good idea to test if you're troubleshooting an app that is supposed to turn the device on or off.
Check Device Events
Besides Logs, another way to check whether an app did with a device is to check the Events page for that device, accessible from the Events button at the top of the device detail page for that device. This table shows a history of events and commands sent to the device:

- The line with A shows an event. This is generated by the driver and is normally in response to a real-world event, like the switch turning on or off (or the temperature of a sensor changing, motion becoming active, a thermostat changing operating state to heating, etc.).
- Any app that "woke up" in response to this device event (due to having an event subscription for this event) will be shown in column D. This can be helpful to figure out what apps are doing something in response to this particular device event, beyond just the "In use by" section on the device detail page.
- The line with B shows a command, indicated by the text "command-" before the name of a command (in this case,
on). The name of the app that sent the command will be displayed in the "Produced By" column, C. This can be helpful if app logging is not helpful enough (or was not enabled) to determine what app sent a command to a device or if the app sent a command but the device did not response (see below).
Verify Hub Time
If you have time-based automations that are not performing the desired actions at the correct time (including specific times or times specified relative to sunrise or sunset), verify that your hub's time settings are correct:
- Navigate to Settings > Hub Details.
- Verify that the following settings are correct:
- Latitude and Longitude
- Time Zone
Not sure how to find your latitude and longitude? Visit https://www.latlong.net or a similar resource to find yours using a map or address. (Users in the US, UK, and Canada can also enter their postal code in the previous field, and an approximate value will be filled automatically for the specified region.)
- After making any changes, select Save settings.
- If you changed time zones, restart your hub when prompted, or navigate to Settings > Reboot to reboot later.
- Return to the Settings > Hub Details page and verify that all time data appears correct: Current Hub Time (as of last page load), Sunrise, and Sunset. If not, verify that the settings in step 2 are properly configured for your location.
Device Troubleshooting
Is a device not working as you expect? For example:
- A device is not updating states (e.g., on/off switch state) on the hub when the actual device changes or doesn't appear to respond to commands;
- A device is unable to be paired to the hub; or
- Any problem you believe to be related to a device you have added to your hub.
NOTE: Beyond the tips here, if your device is a Z-Wave device or you are having Z-Wave problems in general, see: How to Troubleshoot Z-Wave.
Test Device
To help verify if a device is working correctly, try navigating to Devices, selecting the device in question, and manually running commands (buttons at the top of the device page) to see if they work as expected. The goal is to test by manually running commands from the device page to see if the command works here; if it does not, then it will not work with any app, either (including Hubitat® Dashboard, Rule Machine, Motion Lighting, or any built-in or custom app).
For example, a dimmer or bulb should have a Set Level command (and many others). For this command, type a level value (for example, 50), then select the Set Level button itself to run the command. Verify that the device responds as expected. Try other commands if needed, ideally ones you think the app would be calling based on what the app should be doing, if you are troubleshooting a device as part of an app/automation.
If commands appear to work here, additional troubleshooting with the app in question may be necessary (see above).
Enable Logging
Most device drivers offer an Enable debug logging option, which (when enabled) will generally log information that comes into the hub from the device. This can be helpful to determine if/how this information becomes an event, such as "switch on" or "level is 50%" but provides view closer to the "raw" data from the device before it gets parsed into an event (or not). Some drivers may also log when commands are executed, but not all do; most apps offer an option that will indicate when they are running a command (see above) and will be more helpful in such cases.
Most drivers also offer an Enable descriptionText logging option. This generally logs events, like "switch on" or "thermostat operating state is heating." This does not show when commands are executed, simply when the device sends information to the hub and the driver creates an event. Its use in troubleshooting is therefore more limited than debug logging on devices or most app logging, but it may still be helpful.
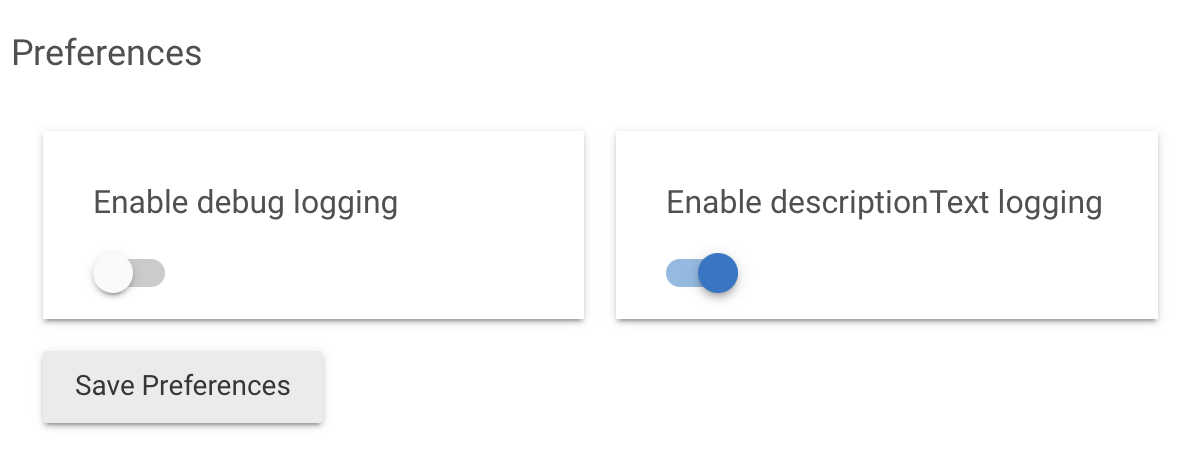
Enable debug logging is turned on for 30 minutes by default for new devices added to the hub, then automatically disabled. It it also automatically disabled 30 minutes after any time it is manually enabled. Enable descriptionText logging is enabled by default and remains enabled until manually disabled.
These descriptions apply to built-in drivers. Custom code (community drivers) may vary, though third-party developers are encouraged to offer similar options.
Check Logs
Check the Logs page (current logs or past logs) to see logs that device drivers may generate if logging is enabled as described above.
With or without logging enabled, errors that the driver does not handle are automatically logged. Thus, even before enabling logging, you can still scan the Logs page for "error" entries that may indicate a problem (but it is generally helpful to enable).
Here is an example of how an "error" entry might appear in Logs (circled in red for clarity here; your logs will not show this circle):

Other Device Troubleshooting
- Check the Compatible Device List to verify you are using the recommended built-in driver for your specific device (or for third-party code, verify that the driver is supposed to be compatible)
- It is generally recommended to run the
Configurecommand on the device page after switching drivers. Try this if you haven't. - The
Configurecommand can also be run manually as part of troubleshooting specific device problems, including a Zigbee device not reporting updated states back to the hub as expected (note that you will not see anything happen on the device page when this command is executed; you may see entries in Logs)
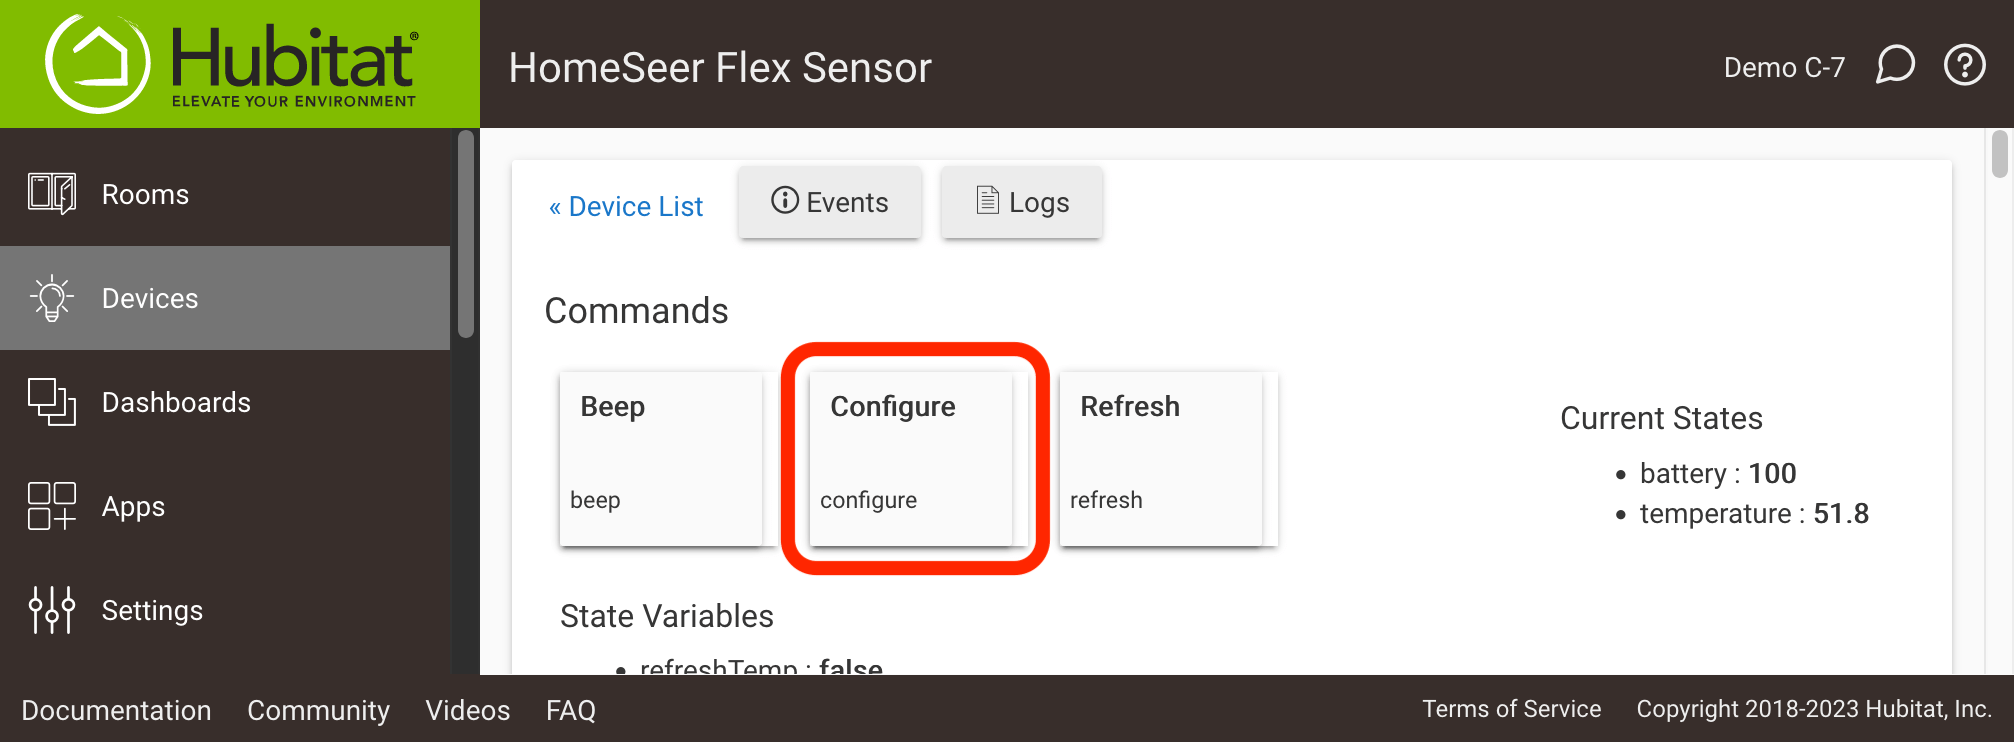
Select (click or tap) the "Configure" button to execute the command, then wait a few seconds. Normally, you will not see anything happen after executing the command, but it may be important in order for the driver to work correctly.
General Hub Troubles
Beyond the app- and device-specific troubleshooting above, the App Stats and Device Stats pages, accessible from the Logs page, may help with troubleshooting general hub issues. These issues include slowdowns, a "Severe hub CPU load detected" notification, a notification that the Zigbee radio turning offline unexpectedly (often caused by extreme load on the hub), and sometimes slow or unreliable app or device behavior that could result from this problem. In general, an app or driver that is using a large total percent of the CPU or other resources may be problematic. However, every app and driver — and everyone's hub setup — is different. Consulting the Hubitat Community for assistance may be helpful. If you suspect a specific app or device is causing excessive resource usage, you may wish to consider if removing or disabling that app or device eliminates the problem (see Disable Device Drivers and Disable Apps).
Soft Reset
For cases of suspected database corruption (for example, apps with "Scheduled Jobs" that appear to be scheduled correctly but do not execute when expected; SQL errors in Logs; and other symptoms), a soft reset and restore from a backup may help. A soft reset does not affect the radios and is thus a generally safe procedure.
To perform a soft reset and restore, assuming your hub is still functional:
- Navigate to Settings > Backup and Restore, then select Create and download under Create and download new local backup.
- You will be prompted to save the backup to your computer after it is finished being created (or some browsers may download it for you automatically; check the "Downloads" feature in your browser).
- Hub Protect or Cloud Backup subscribers may opt to make a cloud backup instead; either a local or cloud backup will work for this purpose.
- Do not reset any radios or clear anything else from your hub; continue with the below steps to restore hub functionality.
- Still on the Settings > Backup and Restore page (and the Local backup tab if you have both local and cloud options available), use the Browse... button under Upload local backup and restore to hub, locate the file you created and downloaded in the previous step, and select Restore File.... to restore this backup. Select Restore to confirm when prompted.
- If you are a Hub Protect or Cloud Backup subscriber who opted to use the cloud backup option in the previous step, select one of the links above the Local backup and Cloud backup tabs to show available backups, then locate the desired backup and select the restore (backwards curved arrow) icon under the Actions column
- If you forgot to download the file in the previous step or want to use an older local backup, select the this hub's backups only link towards the top of the page, then locate the desired backup and select the restore (backwards curved arrow) icon under the Actions column
- Wait for the restore to complete. The hub will automatically reboot, and the restore is finished when the hub comes back up.
If the hub is not accessible, then you will need to try the Hubitat Diagnostic Tool. This tool can download recent backups if the regular UI is not accessible. You can then use the tool to perform a soft reset manually and upload your chosen backup (or restore the desired cloud backup if you are a Hub Protect or Cloud Backup subscriber) on the Getting Started page when the hub comes back online.
If the regular hub interface is accessible, you do not need to manually perform a soft reset; simply follow the instructions above. A soft reset is essentially done as part of the restore process (you can do one manually, but it is not necessary).
If the regular hub interface is not accessible, a soft reset may help bring it back. In either case, restoring a backup is necessary to restore previous hub functionality.
Problems After Upgrading?
Did you recently update your hub and suspect that the upgrade "broke" an existing device or automation? Hubitat allows you to downgrade to up to three previously installed platform versions. You can downgrade to test again and verify your suspicion:
- Optional, but recommended: navigate to Settings > Backup and Restore, then select Create and download under Create and download new local backup.
- Save this file locally to your computer (Hub Protect or Cloud Backup subscribers may opt to make a cloud backup instead)
- Navigate to the Hubitat Diagnostic Tool from Settings > Diagnostic Tool.
- Select Restore Previous Version and select the specific previous version to which you wish to restore.
- Wait for the process to complete. The hub will automatically reboot.
- Re-test the app or automation. (Optionally, re-upgrade to verify the problem re-appears and was not addressed by a simple reboot.) If you believe you have found a problem, you may wish to ask about it in the Hubitat Community.
NOTE: Sometimes, downgrading a platform version requires restoring a matching database due to changes made to the database as part of the platform version upgrade. The release notes will indicate when this is the case. You may wish to restore a backup made under the previous/matching platform version to be certain, though this is often not necessary.
NOTE: A hub backup does not include the platform version (though it does note the version as part of the default filename to assist with matching if required as described above). The platform version can only be downgraded through the Diagnostic Tool and upgraded from either the Diagnostic Tool (if available) or the regular hub interface.
You may also wish to consult the Release Notes category in the Hubitat Community forums for "known issues" topics for your platform version. If your problem is a known issue, these topics will generally suggest workarounds and note if the next release is expected to fix the problem.